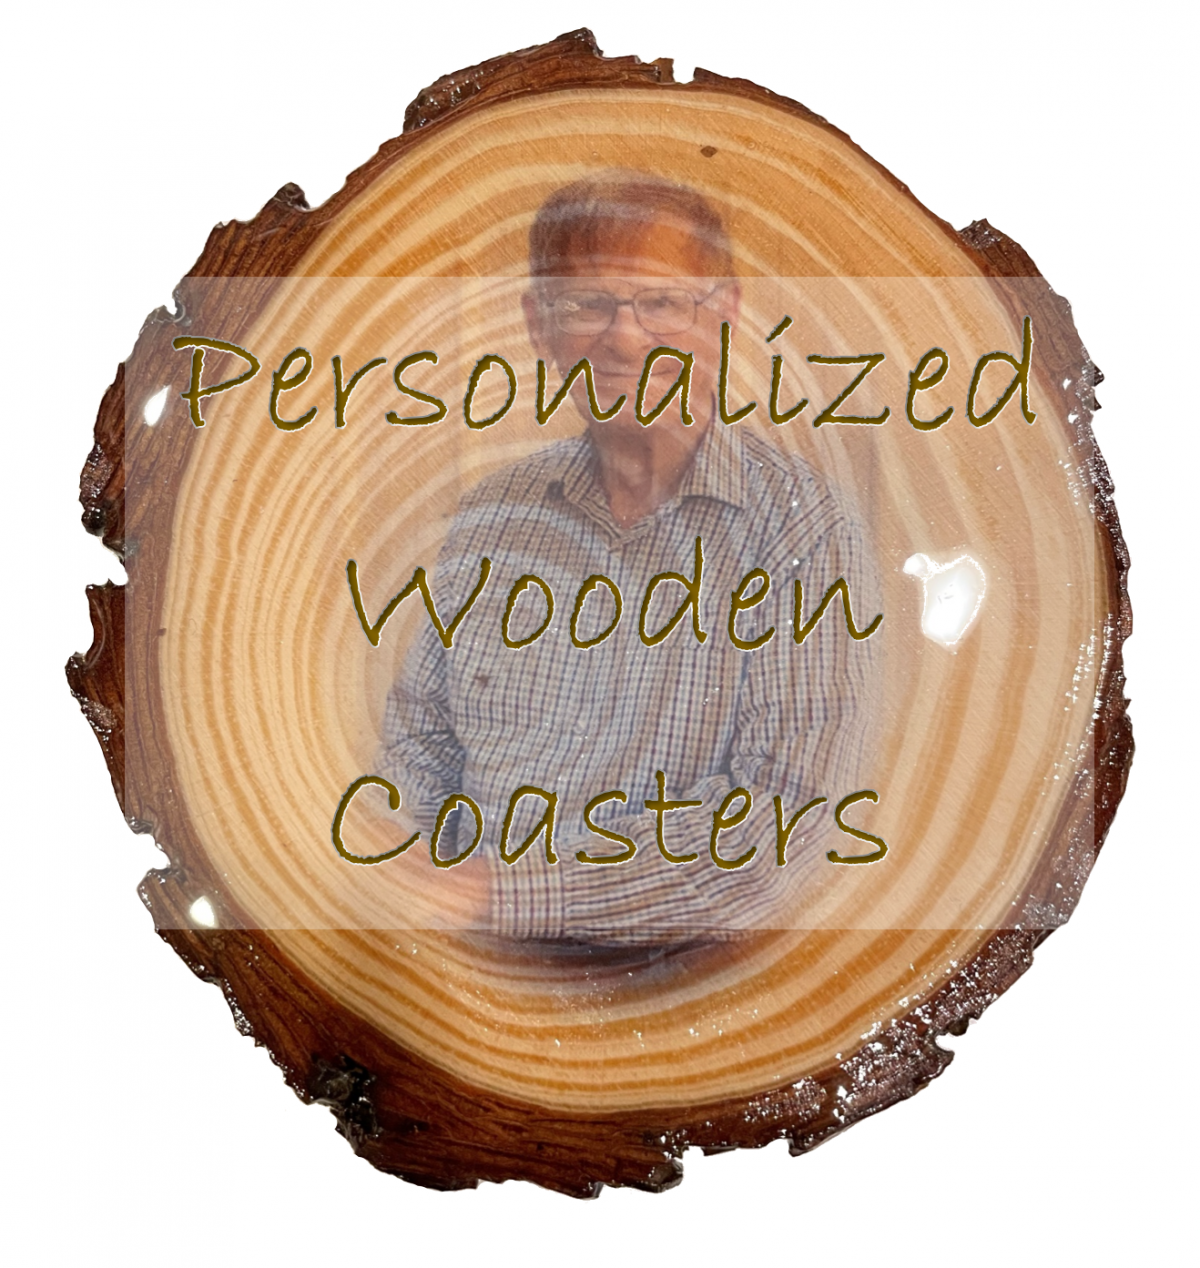
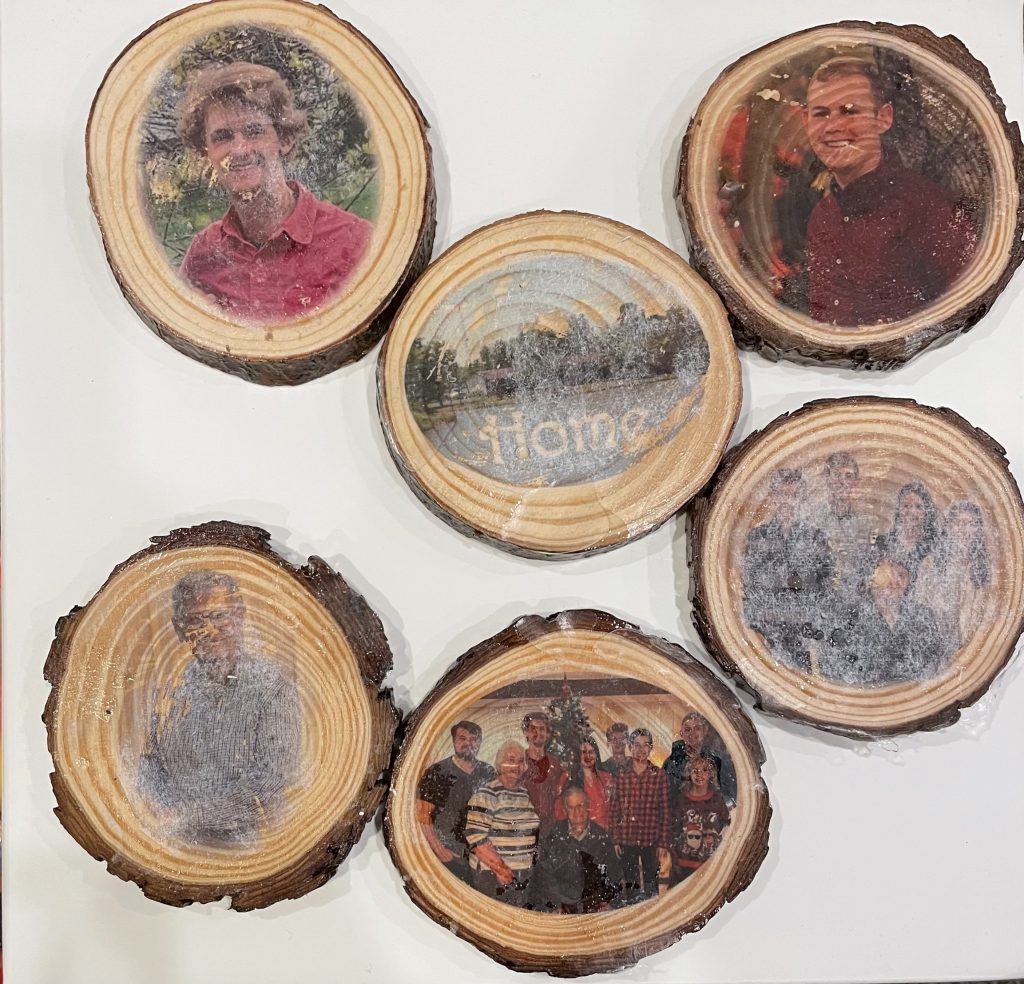
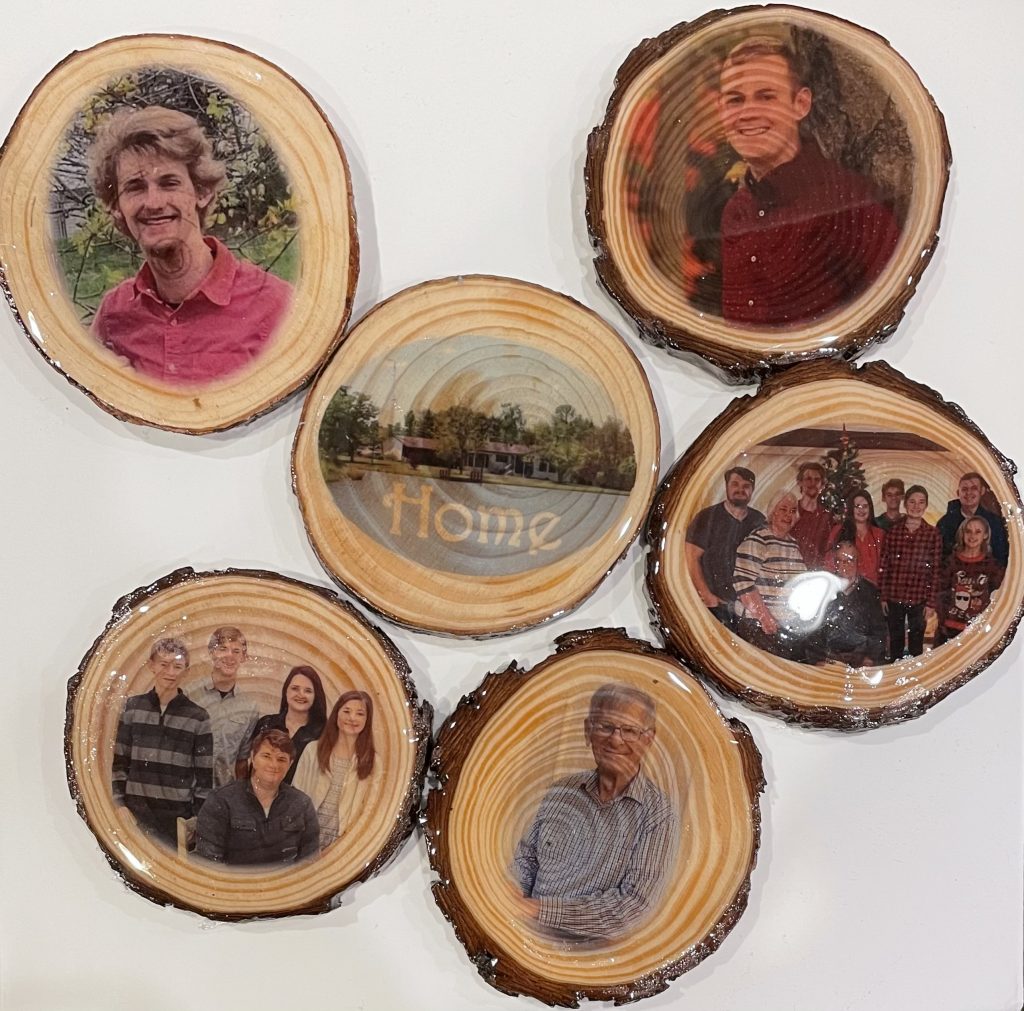
I made some coasters for my grandma as a Christmas gift. They turned out pretty amazing if I do say so myself. Coasters may seem like a lame gift, but with a thoughtful personalized touch, they can be quite nice. I’ll share with you how I went about making them. This project takes a few days from start to finish. Make sure you start with plenty of time!
My original idea was to use wood rounds cut from trees on her property. They cut wood every year to use as fuel to heat the house, so I asked my dad to grab me some slices of rounds that wouldn’t be used for the firewood. This was a few years ago, and I tried a few different ways to smooth them out. Unfortunately to my frustration, I couldn’t get the rough slices out of it. I didn’t have the proper tool for the job, which would have most likely have been a sanding belt. I had to give up, but I didn’t want to give up on my idea. Finally, I just decided to buy some already smoothed rounds on Amazon. You can find them here. I’m really pleased with the quality of the rounds I received. Very smooth, and had nice details. I specifically choose some with the bark still on since that was part of my original plan. If I could change anything, I would like the rounds to be slightly larger diameter. These are probably the minimum that could be used for coasters.
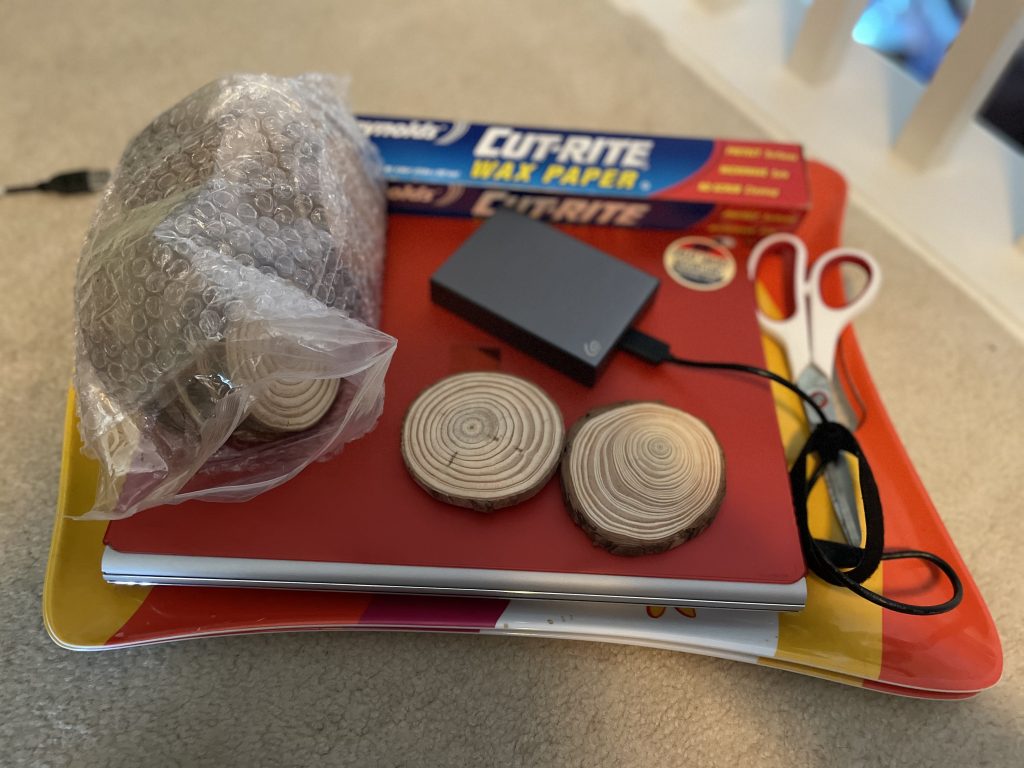
Materials Used
Laser Jet Prints
Disposable bowls & mixing materials
Pick Out Your Pictures
While those are on their way, pick out the pictures or items you want to use to personalize the coasters. I used photos of our family, but you could use some Mod Podged items also. I considered using a maple leaf on one of them, but ended up not doing it so it won’t be included. Keep in mind that bright colors with variance will show up the best. Pictures with dark backgrounds, especially if the subject has dark hair, just didn’t quite look as good as the lighter ones. However, whites will not show up at all. They will end up transparent and replaced by the wood. I actually really like how this turned out in mine, but if I had gone with a picture of us in white shirts, well, that wouldn’t have worked out so well.
Close up shots will also turn out better than far away or ultra-detailed pictures. Most of mine were single portrait shots, but I had a few family pictures. Because of the size and transfer techniques used, the smaller faces and details aren’t nearly as impressive as the closer up portraits.
Edit Your Pictures for Effect
I wanted my pictures to fade into the wood grain, but if you like a stark line or you’re going to go edge to edge, you can skip this step.
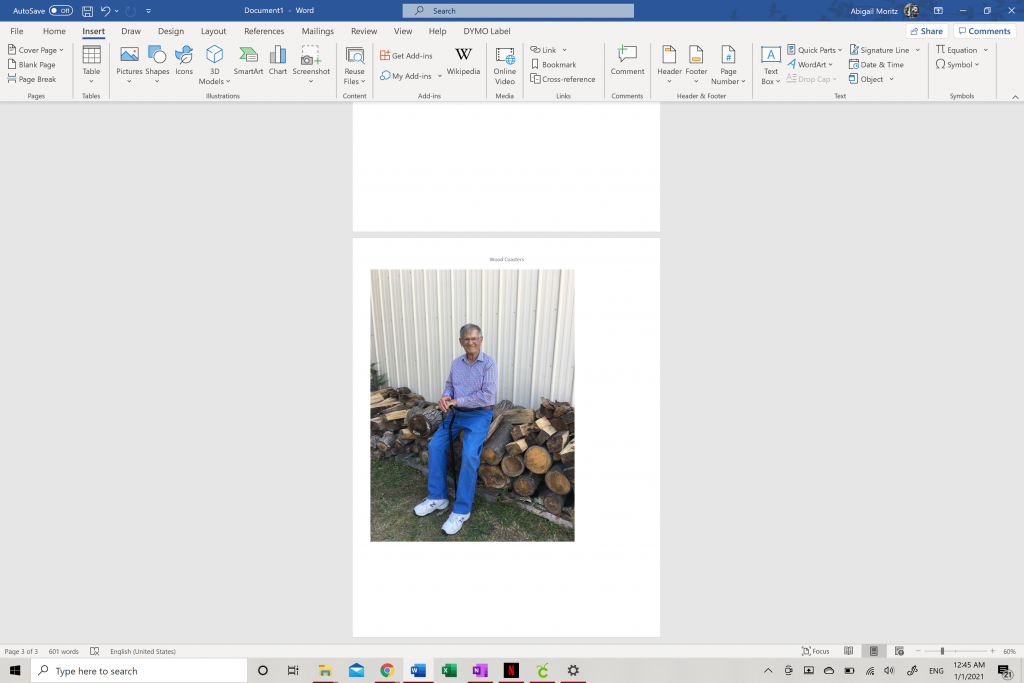
In a Word or Publisher document, insert your pictures to edit. This is really easy. After a couple times doing it, you’ll be able to fly through this step. Although I think I used Publisher, I’ll use Word for the demonstration as I think it’s more common nowadays.
Measure Twice
First things first, you need to know how large of a canvas you’re working with. Mine were about 3 inch rounds, although they weren’t all perfectly round being natural materials. So I first sized and cropped my pictures to 3 in. You’ll lose a little bit of length from the effects we’ll use later, but I didn’t mind. You can always adjust that later if you want.
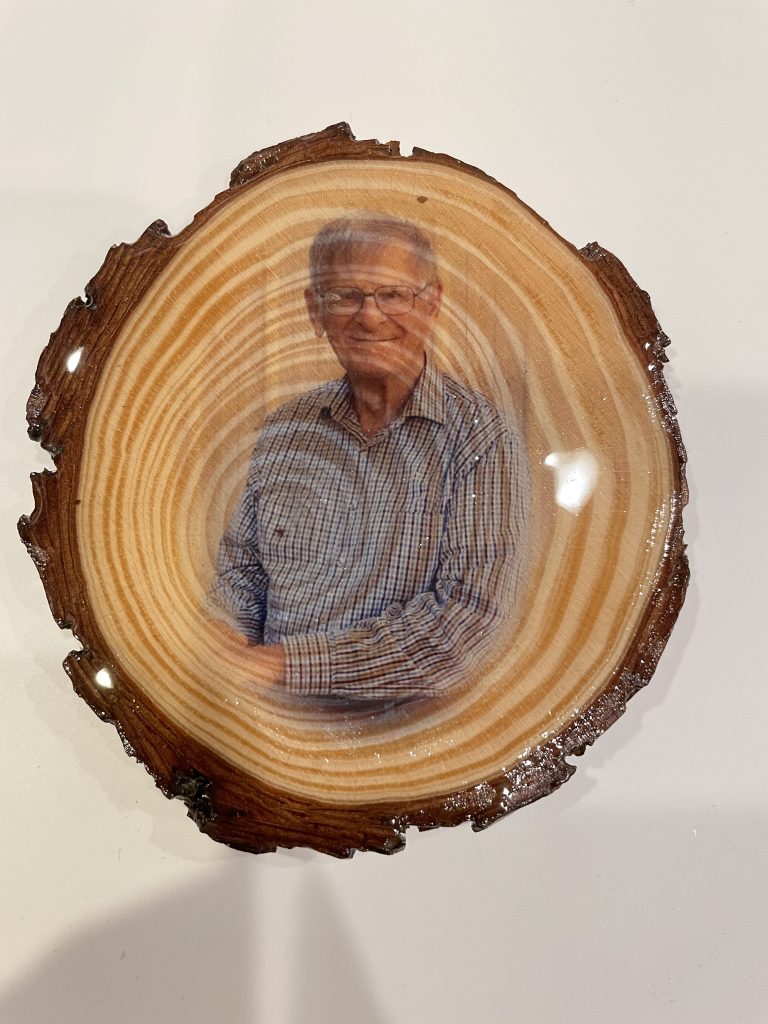
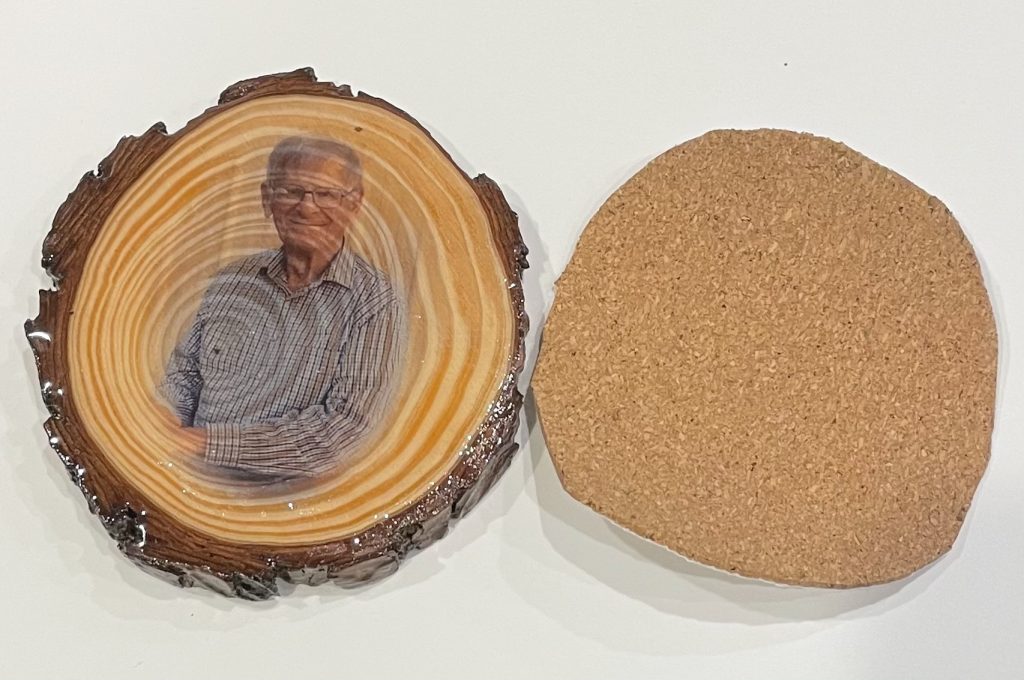
For this, I’ll use one of the pictures from my project of my great grandpa. I really like this picture. Take a look at the bright colors and light backgrounds. This background almost completely disappeared in the final product, but I really liked it.
Resize & Crop
First, you’ll need to resize and crop the image to the correct size for your project. Select your picture to bring up the “Picture Format” menu where you’ll be able to dictate the size and crop the image to suit your purpose.
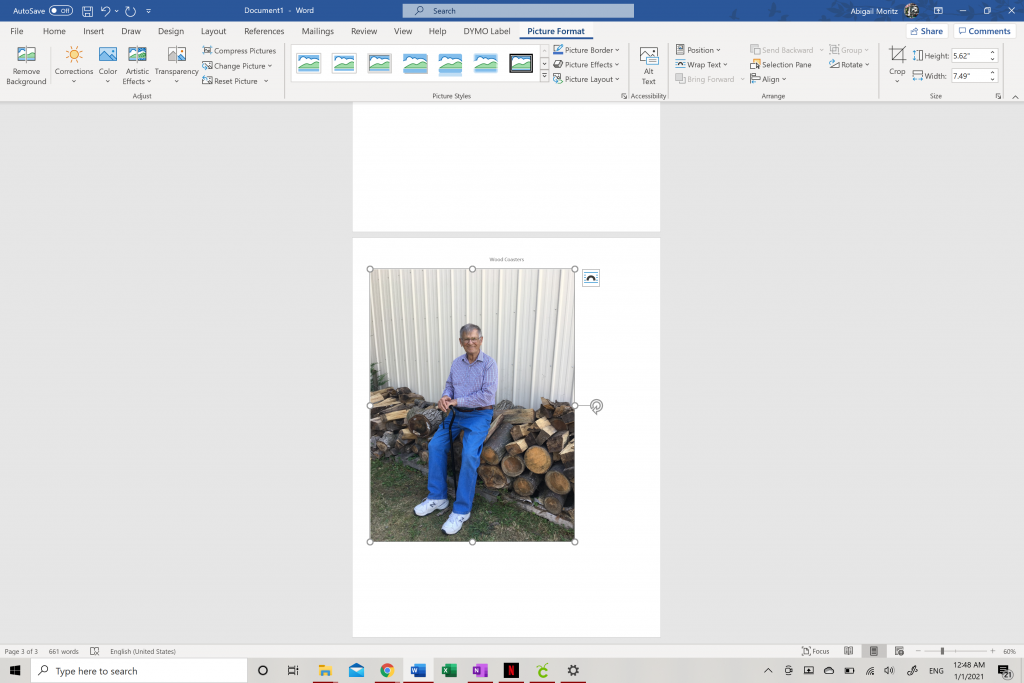
Since my coasters will be circular shapes, I’m going to use a “crop to shape” to get the correct shape. You can find it under the drop down arrow under “crop”. Crop to the size and closeness you want to use. Be sure to use a good amount of space around the main focus of the photo. Cropping too close looks bad, and will end up cutting out the meat of your picture later.
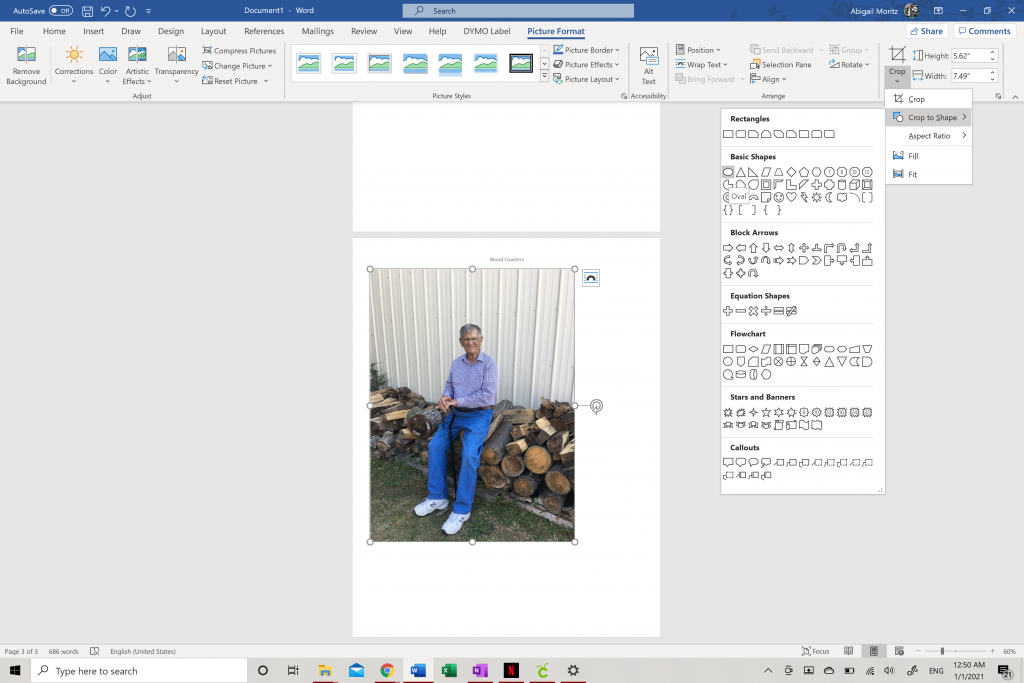
Once you have your initial cropping where you like it, it’s time to make sure it’s the correct size for the project. Again, select your picture and then go to the far right of the “picture format” menu to the “height and width”. Since I’m working on a 3 inch diameter, both of these dimensions should at or under 3 inches. Don’t change the aspect ratio, or your image will get distorted. Unless you have a perfect circle, both numbers won’t be the same. That’s ok, just make sure they are both less than your max work space. In my case, the width is more than the height. When I change the “width” to 3”, the “height” is automatically adjusted to maintain the original ratio of the picture. That’s what we want to happen.
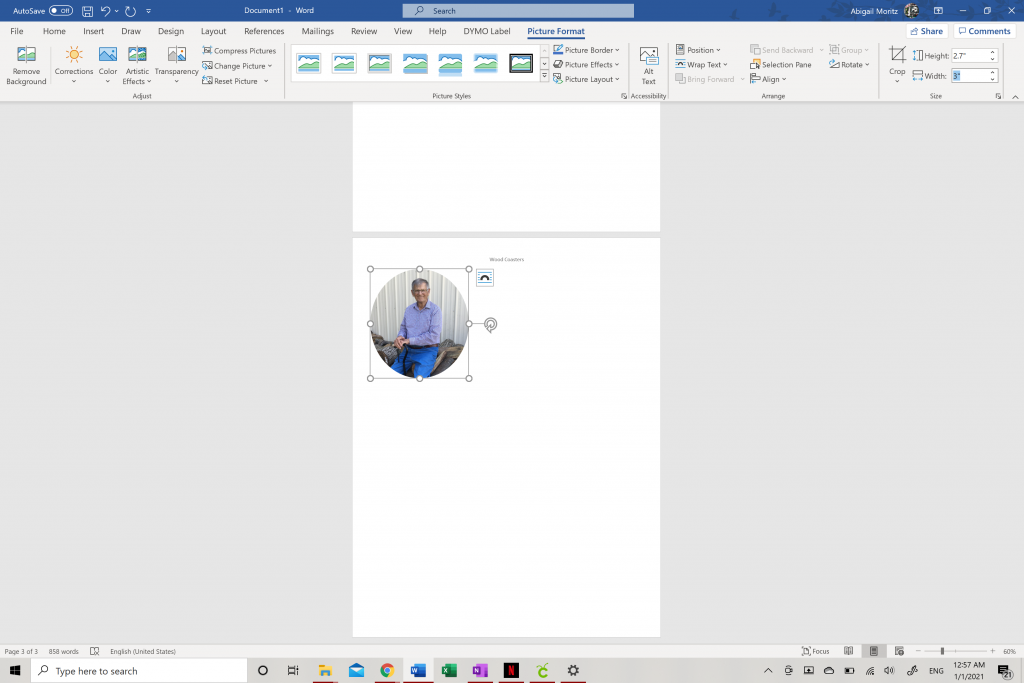
Finally, you should horizontally flip your images so they are mirror images or backwards. This will make it so they will come out in the correct orientation on the final product. Click on your image and go to the “Picture Format” menu. On the right next to “Crop”, you’ll see “Rotate”. This is a drop down menu. When you click on it, you’ll see the option to “Flip Horizontally”. Click on this and then you’ll images will be reversed, and any words in the image will suddenly be written backwards. Again, since the final image will be reversed, they will come out correctly in the end. This part is really important for anything with words or other such oriented things to come out correctly.

Add Soft Edges
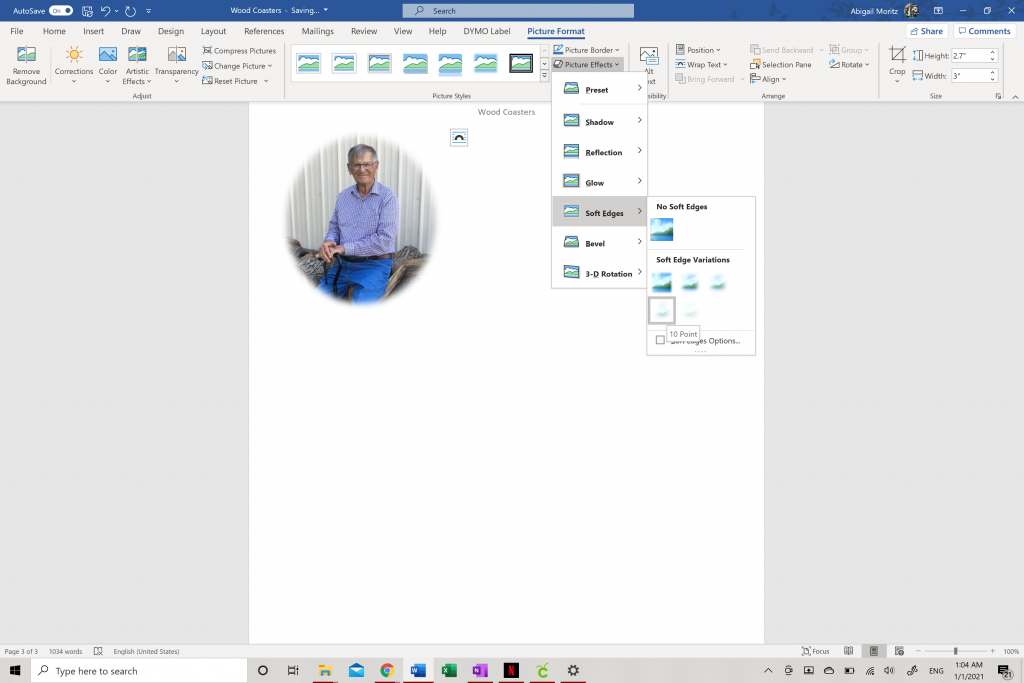
Now that it’s cropped and sized correctly, we will add the effect that will help the picture appear as if it’s blending into the wood. Since we’re cropped fairly small, you can use the slider in the bottom right corner of the screen to zoom in. To add effects, select your picture and go to the “Picture Format” menu. In the center of the menu, you’ll find “Picture Effects”. Click on that to see a drop down menu of effect options. Select soft edges and you’ll see another menu slide out to give strength options. There are default strengths of 1pt, 2.5pt, 5pt, 10pt, & 25pt. You can select any of these to see the differences. If you don’t like any of the defaults, you can click on “Soft Edges Options” to select your strength manually and with more precision. I left quite a bit of background on my picture when I cropped, so I went with the 10pt font. As you can see, the soft edges cut down on the picture. If I went with 25pt, part of my grandpa’s head would start to be faded out. I really like this effect, especially for the coasters. Again, if you want the stark edge lines, then just skip this step.
Pro Tip
Something else to take into account, using white space to your advantage. In one of my pictures, I inserted a bold “Home” as an added effect for the picture of my grandma’s house. I went ahead and removed the background of this section of the picture, but now I realized just making it white will make it so there is no pigment there. Instead the wood grain and color would show through. It turned out great! Especially when using words, make sure to flip the image or your final product will be backwards!
Once you have all of your sized, cropped, and effected pictures arranged on your Word doc, save it as a PDF. It’s time to print! You’ll need to print these on a laser jet printer. All we have at home is inkjet, so I had my dad print them on his office printer. I think most industrial printers are laser jet, so you may be able to take them to a business that prints things like Staples or FedEx. Just check with them which kind of printer it is first. I’d recommend printing 2 copies of them if you have to make a special trip to get the prints. That way if you make a mistake, you can try again.
Cut Once
After you have your prints, go ahead and cut them out. Don’t worry about cutting too close, in fact I left some white space on all of mine. Since you have the fade effect going, too close of a cut will create a stark line. Let the effect do it’s thing by leaving just a little white space. Gives you a break from perfectionism too! In the end, the white won’t be visible.
Transfer Your Pictures to the Wood
To transfer the images to the wood, we’ll use the Mod Podge method. I use Mod Podge Gloss. I believe this is a basic Mod Podge, but I’ve read there is a Mod Podge specifically made for photo transfers. However, that one will keep the white in the pictures from what I understand. I haven’t used any other formula, so I can’t speak to their quality or affects. As I mentioned, I like the white disappearing and even used it to my advantage. This formula worked well for me. If you tried another formula, let me know the results and any differences you noticed!
I recommend having some newspaper or wax paper down for this next step. It can be messy!
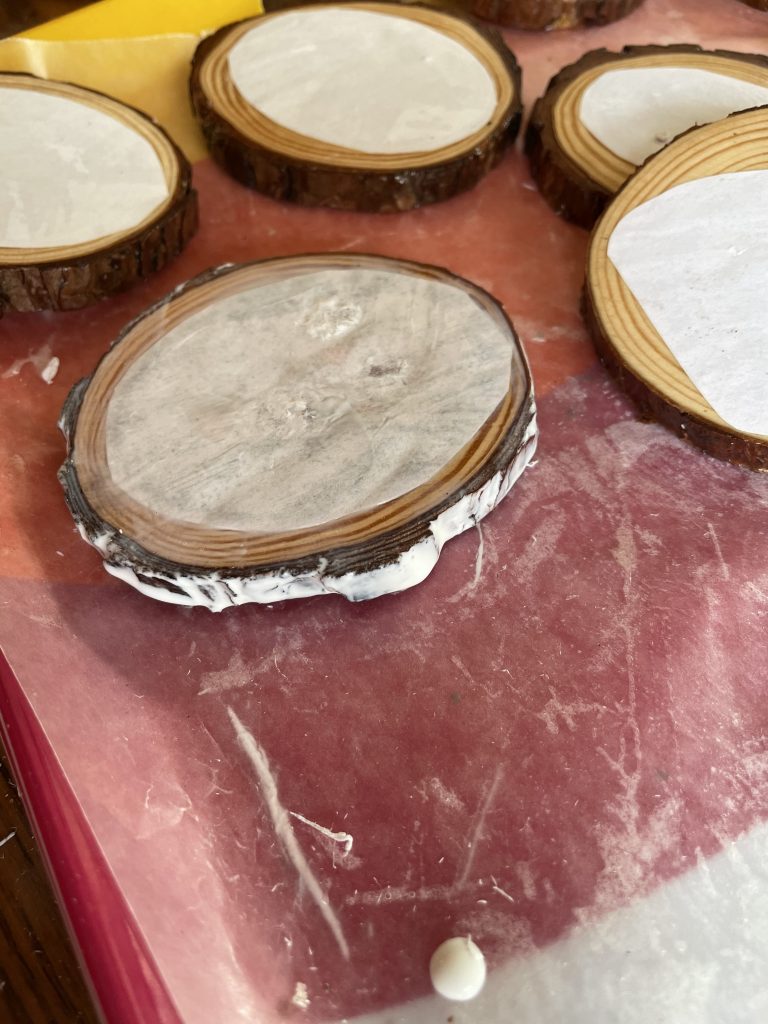
Take a healthy amount of Mod Podge and glop it onto your coaster. The first time I did this, I used a really thin layer. It was not enough! The images didn’t transfer well enough and started peeling off during the reveal step. No good. Glad I had second copies of my pictures! The second time I used a really healthy amount on each and the images came out so much better! Use an old gift card or one of those cards that come with screen protectors to spread the Mod Podge around the surface of the coaster. I wouldn’t recommend using anything you will want to use again for this.
After spreading the Mod Podge, place your picture face down on the Mod Podge. Take your scraper and smooth down the picture and squish out the excess. No need to scrape it dry, in fact probably don’t, just make sure there aren’t bubbles and the paper appears to be laying flat. The Mod Podge may run down the sides. Either just wipe it up or use it to your advantage! My wood pieces still had their bark on them. The bark tended to be a little fragile and easily broken off as you can imagine. I used my finger to rub the excess Mod Podge over and in the cracks of the bark. This made it a bit more protected and less fragile. Don’t worry if it looks too opaque white, it’ll dry clear.
Do try to avoid getting the Mod Podge too much on top of the paper. This will be a little difficult with the smoothing step, but if you can leave at least a little bit uncovered by Mod Podge, it’ll make your next step that much easier.
Let Them Dry
This is the easiest part! Just set them aside and let them dry. I saw a tip that said to give it 72 hours to dry. Seems excessive, but I think it really did help! That way the pictures get plenty of time to really transfer to the wood and dry.
The Reveal!
It’s time to see how the picture transfer went! This part can be really satisfying, but also takes some patience and a gentle hand. Now that your pictures are dry, we’re going to get them wet again. Get a a glass of water and a rag you don’t mind getting dirty. I don’t think this will ruin your rag, but let’s not risk it.
Dip a corner of your rag into the water, and gently rub it over the top of the paper. It should start to get damp and roll and tear. If you can grab a piece, you may be able to gently tear the paper to get the top layer off quicker. Once everything is wet and the top layer has come off, start using your finger to gently roll the paper layers off. The rag is like the equivalent of sand paper for this so the closer you get to the image, you’ll want to be more careful.
As it gets wet, you’ll be able to see your image through the paper. Just keep gently rubbing the white paper off to reveal your image clearer. Be extremely careful and gentle. Don’t spend too much time or push too hard on one area all at once or you’ll end up peeling the image off the wood. As the image dries again, you may see little white fuzzies show up again over top the picture. I find it’s easier to do this in steps of wet – let dry – wet again. Always being careful and gentle, seriously it’s so easy to take sections of the ink off with you at this stage. Feel free to start a new coaster and come back to a started one later just to let it dry. If your edges that we didn’t cut off earlier are still there, you can rub those hard to remove. Just be sure not to accidentally rub any of the image away!
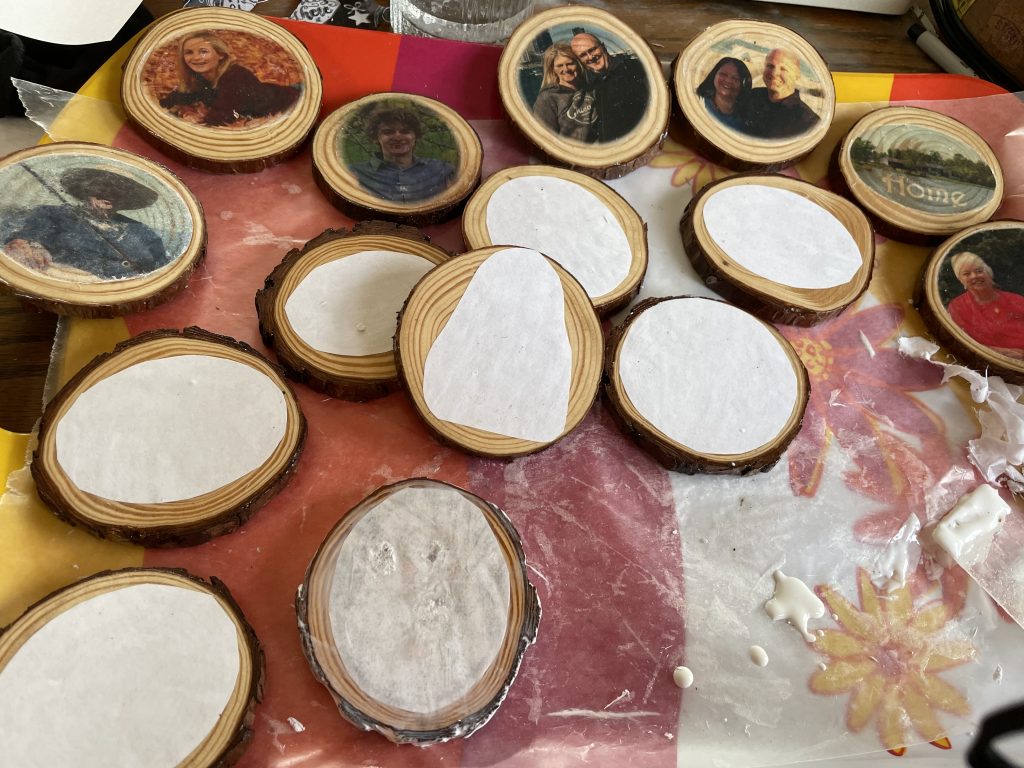
Eventually, you should be able to clear all of the white from over top the picture to reveal a really great image. I was so pleased with the color quality and clarity of my pictures! Some of my pictures had little parts come off, but it is completely possible to do this without any of the picture coming up. The plentiful Mod Podge, and longer drying times greatly helped boost my success!
You may notices that some of the rings and natural colors of your wood will show through the image a little bit. I considered this a bonus to the design I was going for, but you may want to take in the placement of especially dark circles. A couple of my siblings got a particularly dark center in the middle of their faces which looks a little funny, but by no means ruined the picture.
I experimented with spraying some almond wood polish we have on the rounds. They didn’t do much with all the Mod Podge preventing it from getting to the wood. I did try wiping some blanks down with it before transferring the image. It makes the rings of the wood stand out a little more, but not so much that I’d say you need to do it.
Let Them Dry Part 2
We just want to make sure that there is no residual moisture hanging around when we go to do this next part. It’ll also help you double check that the pictures are really clear and ready to go. If you find any white spots, just wet your finger, remove gently, and come back to this part after.
Finishing Coat
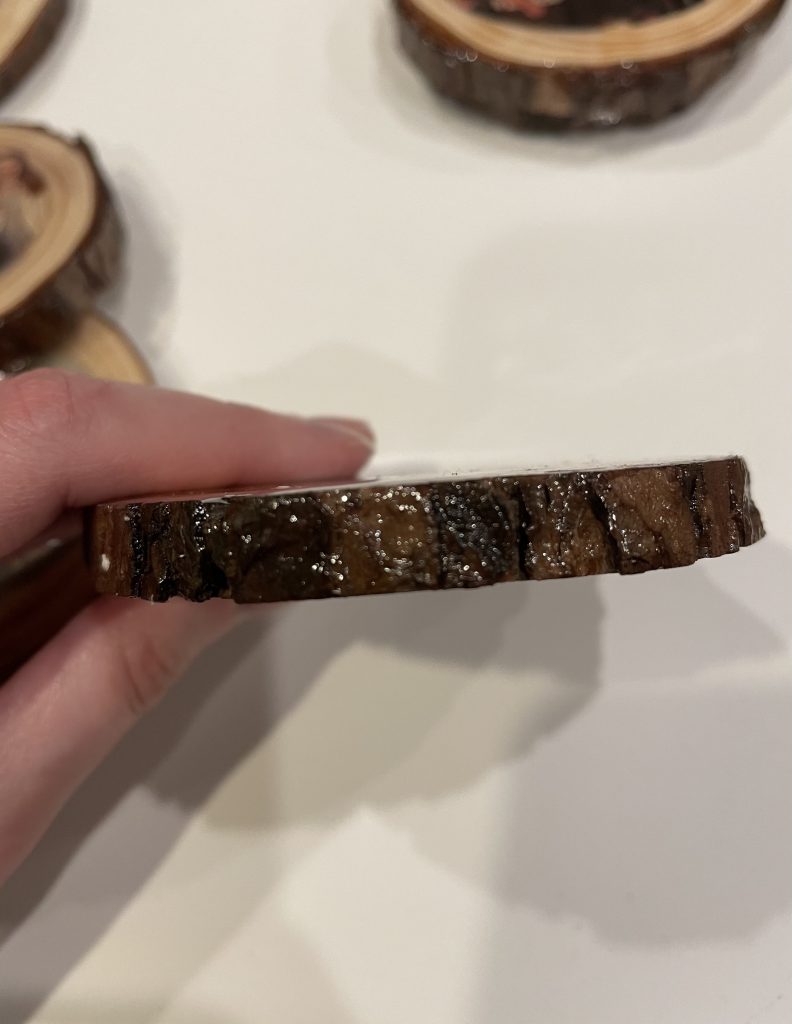
Make sure you definitely have a protective layer between your projects and nice surfaces for this one. We’re going to cover the coasters with a resin-like finish. I use EnviroTex Lite Pour-On High Gloss Finish. This stuff finishes beautifully, but can be a little tricky to get right. I messed up the measuring on 1 of my dad’s coasters a few years ago, and I think it might still be sticky! It just never set properly. Be sure to measure carefully & accurately. Most of all, be sure to follow the directions carefully!
Everything you use to mix, pour, and stir this stuff you will want to be disposable. The directions mention a way to possibly clean them, but it dries hard and permanent, so I’ve never risked it. I’ve used a little measure cup like you get off of cough syrup in the past. This time I used some materials I found at Dollar Tree and was really careful to pour to the same line both times. I really like these clear bowls for mixing (or these would be good!), and popsicle sticks are a classic for this kind of task. The directions do recommend something with a flat edge for scraping the bottom and sides, so I broke one end of the stick so it’d be flat. I also used these little cups for the initial measuring. It’s not very precise, but luckily it turned out great. If you can find something like this, that’d be much better!
Make sure you have all of your coasters laid out ready to dry and not touching each other. Once you mix, you will need to move quickly to get everything covered before it dries.
Mix thoroughly according to the directions, then pour a glob onto the center of your coaster. Use another old gift card or other disposable flat spreader. Be generous with your amount and get it thick and evenly spread out. It may run over the sides when it’s drying, but that’ll not be too big of a deal. After covering them all with a thick coat, leave them to dry. Read the directions for ideal drying temperatures and time.
TIP: You will want to breath on the unset project periodically to get rid of little bubbles. Apparently carbon dioxide is what makes the bubbles go away, not heat.
Once they are dry, you should have a clear, hard beautiful top of a coaster! If you have any resin on the bottom that is making it uneven, you should be able to peel it off no problem since it is most likely not completely covering the bottom. If it isn’t affecting your coaster in any way besides looks, don’t worry about it. We’ll cover up the bottom with the next step anyway.
Add a Bottom
What’s the whole point of coasters in the first place? To protect your furniture! So you will want to make sure your coasters don’t do more harm than good, especially a hard material like tiles. Add a little layer of cork at the bottom really finishes this project off, and adds a bit of quality about it. This is the one I use.

I’ve gotten a lot of mileage out of this roll, and I don’t even feel like I’ve barely scratch the surface of it. It has a sticky backing, but I still use glue to permanently attach it to my projects. Usually I’ll use hot glue, but given the specific materials in this project, I opted for wood glue.
Measure your pieces. With something as inconsistent shape like this, I traced around each coaster individually. I think it’s best to have the cork just slightly smaller or flush with the edge of the coaster, so I would cut a little inside the outline I made. You can trim it down after attaching, but it’s best and easiest to get it right before attaching. Simply spread some glue on and spread the cork so it’s flush. Wipe away any excess glue seeping out, and let it dry. So easy!
Enjoy Your Spoils!
These coasters come out so good, you’ll hardly believe you made them yourself! My grandma absolutely loved them.
My aunt actually suggested I start making these and selling them. I’d be willing to give it a shot, but I don’t know if anyone would be interested. If you’d be interested in commissioning some of these, contact me!
Of course, this is just how I do it. You can make it your own! These are more like guidelines anyway.
Some links may be affiliate links. These may or may not provide a small commission from using the links at no cost to you. I only suggest products I like regardless.
3 replies on “Personalized Wood Coasters”
These are very very cool! I’ll have to try this out!
I found one of your gems in a local Geocache. Though I’d look you up. Pretty neat stuff Sir! Thanks for the info!
Thanks so much! That makes me really excited that you followed the gem. I just made those recently and thought it was a long shot anyone would check me out. I’m a fairly new blog and I’m still working on transferring some posts from my old website. Be sure to check back for more!
Superb blog! I just read an article on your distinguished blog, and it was absolutely riveting. It was instructional and gave me a lot of new insight on the topic. Your writing style is introspective, and I found myself fascinated by your verbosity. Thank you for providing such an outstanding and provocative blog!