This is the only app on my list that is actually branded towards Christmas, but it’s a great resource for any gift giving event. Santa’s Bag is an app that helps you organize all of the details around gift giving. They’ve thought of all the details and options – you can even change the decorative Santa’s skin tone in settings if you want.
On the summary page, you can set a budget for your holiday and the menu keeps track of your progress by gifts purchased, gifts to buy, and the total over/under budget you are. It also has a time clock counting down to Christmas.
You can also view your plans organized by recipients. You can log everyone you want to get gifts for and view them as a list. After you select a recipient, you can see more detail for that specific recipient. You can list gift ideas, links, merchants used, preferences, and even set a budget for each specific gift recipient.
Another menu lets you look at all your gifts sorted however you like. I personally like to use the status option which sorts the gifts by whether they are an idea, purchased, shipped, delivered, wrapped, and gifted. They even have an option for handmade gifts and stocking stuffers!
I love this app because it helps me remember the gifts I want to get or have purchased and keep track of where I’m at with each of them, so I don’t forget anything. The best part about this app is, it’s free! There is an in app purchase available to remove advertisement banners if those bother you.
Now that you know how to organize all the gifts you’re going to get, you going to need ideas on what everyone wants. The perfect app for that is AnyList. Now hear me out because you may know AnyList as a grocery app. That is exactly what it is, but due to its shared feature, it makes it the perfect app for wish list sharing. My family uses AnyList for a shared grocery list. It’s great because it updates the list in real time on everyone’s phone so we can all add and whoever is at the grocery can quickly see what is needed.
Another great use we’ve found is that everyone can make their own wishlist and share it so we can see ideas of what everyone would like for birthdays and Christmas all in one place. The app has built in categories that you can use to organize the items or you can make your own. You can also add notes and links to help would-be gift givers understand better than just the tagline might allow. We use this to link to Amazon wishlists or certain specific products or add sizing information.
The only thing is you have to make sure everyone understands that the only person who can make changes to a wishlist is the owner. Since everyone sees the changes, if you cross something off the list then it gets crossed everyone’s list and it ruins the surprise.
The base app is free which allows you to do everything I mentioned before plus add recipes and meal plan, but you can also opt to subscribe to AnyList complete which adds the ability to put pictures on items, sort by aisle in the grocery store, use AnyList on a desktop computer, import recipes, add item pricing, turn on a passcode lock, receive priority support among other features. There are options for an individual subscription or a household subscription that lets you add others’ emails to your subscription. We’ve been happy just using the free version, but some of those features in the upgrade do sound awesome. I think you’ll be happy with the app either way you choose.
Pack the Bag is another app I use year round to plan my travels both big and small. I’ve tried so many packing apps and this one is the one I come back to time after time. The app comes preloaded with lots of items you can choose to add to your packing list, but you can edit or add new ones to be more specific to your packing needs.
The items are primarily sorted by category. You can edit categories or add new ones if you like. You go down the list and choose which items you want to add to your packing list. If you fill out the dates of your travel, there’s even a shortcut that will automatically add 1 item for each day of travel. That’s great for things like underwear and socks that you use everyday. The best part about the categories is you can minimize them to allow for quicker navigation and reduce visual clutter when you’re using the app. Sometimes the same item is listed in more than one category, but the app will tell you if you’ve selected the same thing twice in different categories. I really like the suggestions already built in. They even had things I sometimes forget to include in my list when I do it from scratch. You can also add pictures and weight to each item. The app will actually total the weigh of your items as you pack them. Anything you add will stay in the list of options for any future lists you might create so taking the time to detail the items is nice for later trips to benefit from.
While you’re packing, you can turn on a filter that only shows unpacked items. Again, reducing visual clutter so you can see quickly what is still left to find. You can also turn it off to see everything or see just packed items.
The app is free and so useful as is, but as most free apps are there is an option to upgrade to Pack the Bag Pro. It is sold as a separate app which costs $3 in the app store.
If you are doing any traveling or perhaps going in on a group gift, this app could help you a lot. This app takes any purchases and splits them as you want. You can do one time purchases and assign who is involved, or you can make a group and add multiple purchases from multiple people in the group.
As I mentioned before, you can have the app split it equally, but you can also choose other ways to split the payments as well making it really flexible. You can also choose whether you want traditional paybacks or you can choose to simplify payments. When you select this option, the app does the math to have everyone just do 1 payment instead of several redundant ones. So for example if Susan pays for something for herself, Bob, and Jeff and it cost $90; then Jeff pays $120 for the group. Instead of Jeff paying Susan $30, then Susan paying Jeff $40; the app would just tell Susan to pay Jeff $10. That’s a simple example, the app will take even more complicated scenarios and just tell everyone what they owe and to who – it’s awesome!
Something I don’t love about this app, it requires you to put in the participants email instead of allowing just names. It confuses people sometimes and not everyone wants to download the app. Now they don’t have to, but it does still email them. I do wish there was a way to track on your own without adding emails especially when I’m just trying to track for myself or I know that others don’t want the app. It’s a really good app other than that. Plus, if everyone downloads the app, then anyone can add their own expenses in real time.
Splitwise also integrates with PayPal and Venmo so the participants can link straight from the app to make a payment. Then the app updates automatically that a payment was made and updates the status to settled. You can also mark payments manually if you choose to settle up in a different way than the integrated options.
I use this app with my friends and family frequently for group trips, splitting food costs, or going in on annual costs.
The app is free, but does have a Pro option done as a subscription for $3/month or $30/year. Pro allows you to scan receipts, go ad-free, currency conversion, itemize expenses, plus other features.
I definitely use this app more than just around Christmas, but I tend to be home, ready, and able to make all of my favourite foods in December.
I used to use a different recipe app before they went subscription only. That sparked me to find a great option in RecipeBox. The coolest feature is that it has a Focus Mode that will keep your phone from going to sleep for an hour while you remain in the app. This is great especially when your hands are covered in whatever you are baking and you want to review the instructions or measurements. It takes the most annoying part of digital recipe books and solves it!
You can categorize your recipes by categories, but also mark some as favourites to get back to quickly. You can add notes and urls in addition to the traditional things you expect to find in a recipe.
The app also has a Discover function where you can scroll through recipes or search for inspiration. There’s also a Shopping List and Meal Plan function in this app too so you have options.
I know I already said what the coolest feature is, so I’ll just call this the other coolest feature. You can import recipes directly from websites using your computer. and maybe the other other best part…the app is Free! No in-app purchases or subscriptions, you just have to make a free account if you want to use it across multiple devices or use the import feature.
Finally, I had to add this app because it is just one of the all time best apps, and it always blows peoples’ minds when I introduce it to them. The Vault is an encrypted, secure app that allows you to store valuable information such as passwords or important information. It also allows you to include pictures. It is pretty free form, but it also allows you to search through the app for test to find what you’re looking for quickly.
I store all of my passwords in The Vault. I am able to sort it into categories. For example, I have a category for my blog where I keep the important information for the accounts used to run More Like Guidelines, and less secure information like the specific color codes used for my logo. I also have a category for my wallet. I put pictures of each of my cards in there along with the credentials to login to their apps. That way, if I ever lose my wallet then I have a list of all the cards I need to pause, and I have the phone numbers I’ll need to call. I also have the numbers typed out which helps for online shopping when I don’t want to go get my wallet and it lets me copy and paste.
Now I’ve mentioned a lot of really sensitive information being typed into the app, but of course they have a great solution for that as well. The app has built in features so that when you type something next to something like password, it will block it out with green dots so if someone is looking over your shoulder it isn’t immediately visible. You can slide your finger over it to reveal what is hidden. Same thing with credit card numbers and other data.
One other little pro tip I would give for this app. If you have an account that is associated with your address or phone number, type that into that account’s page. That way if one of those things ever changes, you can just type your address into the search and it will show all of the accounts that need to be updated to the new information.
The app is free, but does have several in-app purchases for some of their more advanced features.
These are some of my favourite apps that I like to use. I hope you find them helpful or maybe they’ll inspire you to go find a new favourite app of your own because, after-all, these are More Like Guidelines anyway.
I was very excited when Apple announced their AirTags. I’ve been looking into getting some trackers for years, but I didn’t like the existing options. They were expensive, and the options for when the battery inevitably died were not satisfactory. I am so pleased with the price of AirTags and the expected experience for when the batteries die next year. Plus, I already like and use the Find My app!
I recommend buying the 4 packs of AirTags. They are cheaper purchased in a multipack than they are solo. A 4 pack retails for $99, which comes out to roughly $25 a piece. That’s a lot better than $29 for individually sold devices. Especially since, if you’re like me, you’ll want to stick them on everything!
#1 – In My Trailer
Hidden inside a cabinet just to make sure it doesn’t move.
If you’ve been reading my blog, you know that I travel a lot, and when I’m not working, I’m living in my RV. That’s a big ticket item that I leave unattended for long periods of time – sometimes months at a time – so naturally I try to use every resource available for securing my trailer and preventing the unthinkable. First thing I did when I got my set of AirTags was to put one in my trailer as a “low jack”. Now, I can see it’s position while I’m away.
One key to this is to make sure that it is somewhere out of site. If a thief can find the tracker, then they can disable it or toss it out. I hid mine inside the trailer, way in the back of a cabinet that is deeper than it looks. Also, I don’t want it to be too difficult to get to for myself because I will have to change the battery eventually. I do check the trailer’s position every once in a while just to make sure it is where I expect it to be.
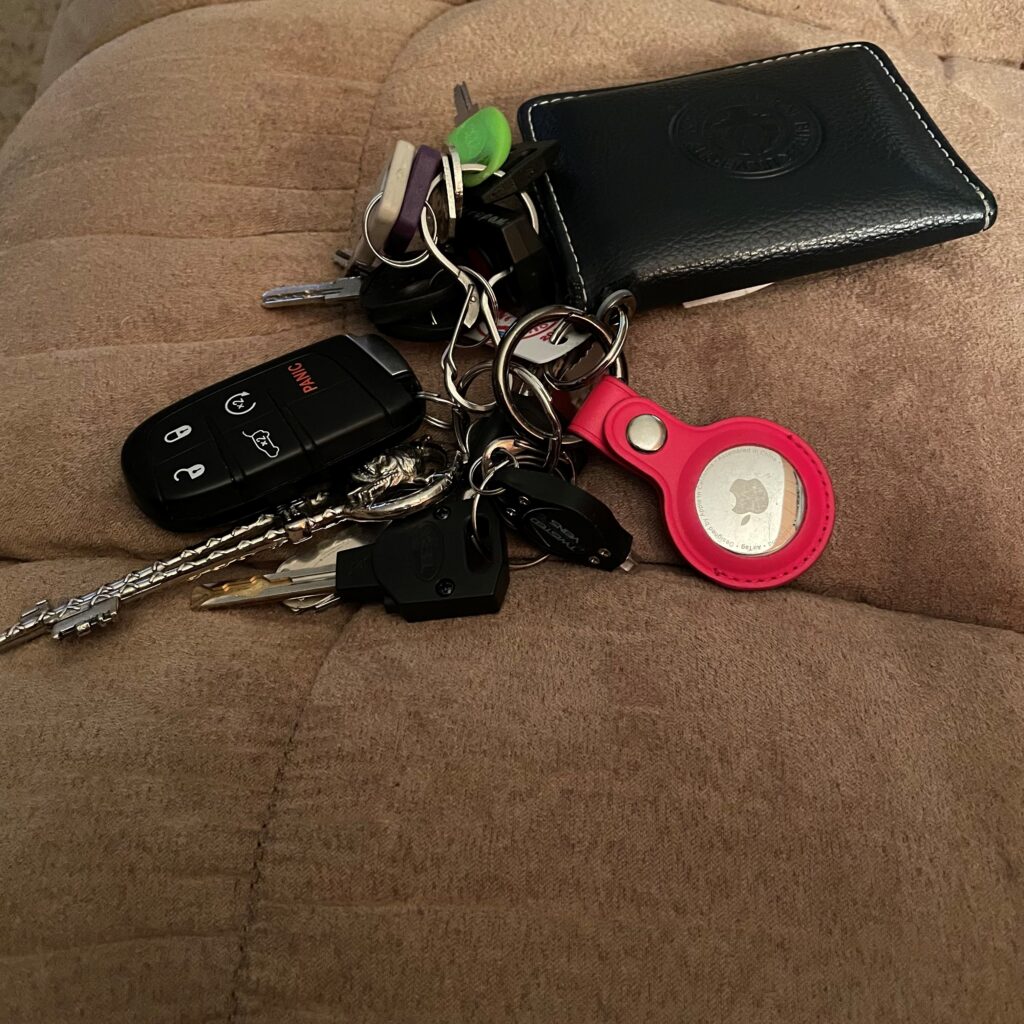
#2 – On My Keys
I have so many keys because all my trailer locks are different!
Wow! What a surprise. I know this is one of the most obvious places an AirTag is going to go, but it was my number 2. I don’t lose my keys very often because I usually put them on their hook right away, but it also can’t hurt. Plus, whatever the keys are in now has a tracker in that too.
#3 & 4 – On My Luggage
I guess I should say in my luggage.
Like I mentioned before, I travel alot. I basically live out of suitcases for work, and I fly several times a month. At the time of writing, I’m actually in an airplane right now waiting for takeoff. It’s also my second flight this week! So knowing where my luggage is located is essential so #3 & 4 went into my suitcases.
A couple tips. It is not ideal to attach the AirTag on the outside like a luggage tag. Not so much for risk of being stolen, but it is likely it could be ripped off in the baggage process. I actually had mine on the outside right next to my luggage tag, but the clerk at the desk told me to put it in a pocket so it wouldn’t be ripped off and lost. In my large bag, I have it in the large front pocket. In my Briggs and Reilly carryon, I have it in the pocket for the portable charger on the back. There are more and more accessories coming out for AirTags, and I’ve seen some luggage tags on Amazon designed to also hold an AirTag. Again, just keep in mind it runs the risk of being ripped off and lost in transit.
#5 – In My Car
Yes! I did buy a second pack. I tested out my first pack, and decided I liked them so I bought another. I actually found them on Woot! for a $5 discount off the 4 pack. Score! It may not be much, but for a brand new Apple product, I’ll take it.
So yes #5 went to my car. I liked the idea of the “low jack” in my trailer so much, I decided to put one in my car. Again, placement is key so it’s not in immediate view. I put it in my glovebox. Not the sneakiest of hiding places, but I didn’t want to forget where it was, and that’s out of the way.
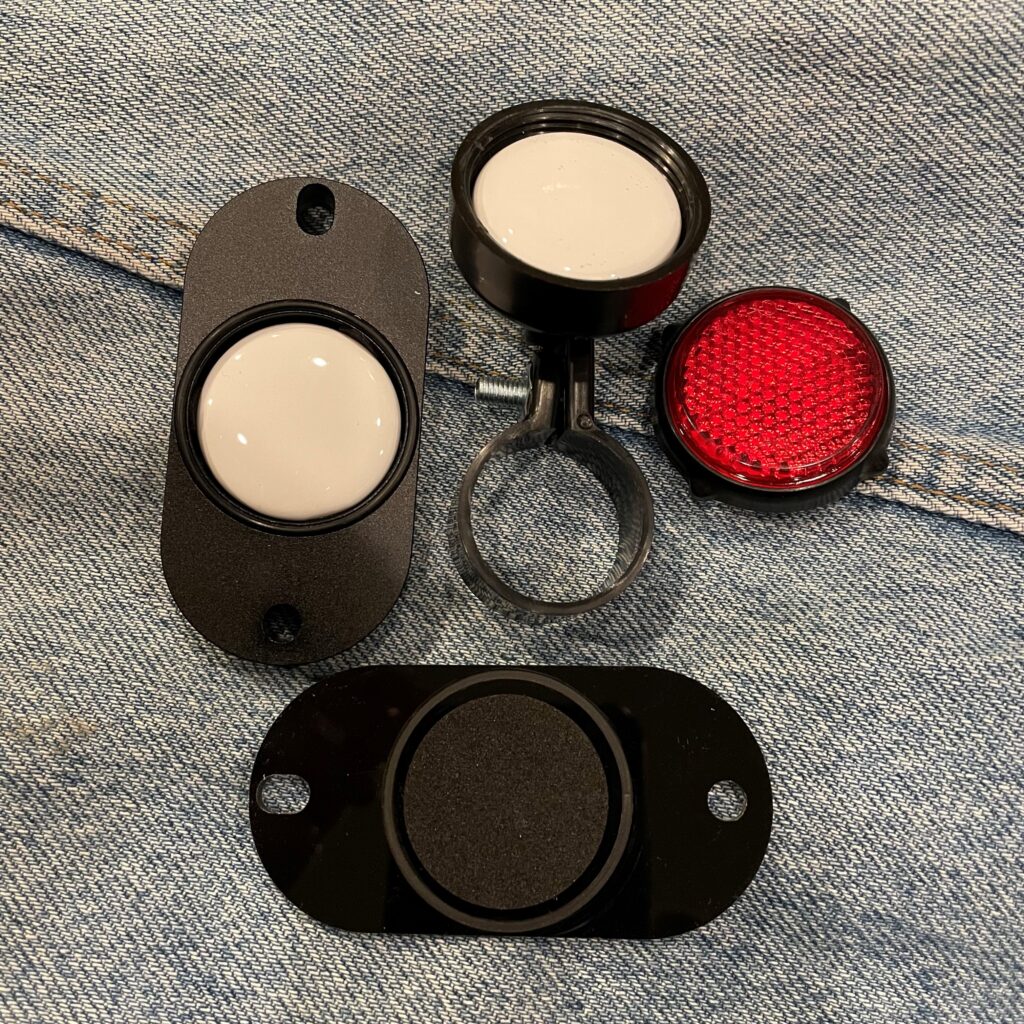
#6 & 7 – On My Bike
The 2 bike options opened to show where the AirTags go.
I have been buying some equipment to be able to transport my bike with me, but this does require it to be outdoors and vulnerable. Of course, I’ll be locking it up, but…..just in case.
I have 2 tags on my bike. I had a spare, and I liked the backup of having 2 on there. Incase one of them is found, the other is still there. One of the cases I used looks like a reflector for the back of the bike. I have had an issue with this style. The first one I bought had a weird connection design, and it didn’t fit anywhere on my bike. I replaced it with the other reflector I found on Amazon, and it was also too small. Luckily, I had a longer screw and could use it to connect the second one. It is frustrating that out of the box they don’t fit.
The other style I bought seems to be the most popular on Amazon. It goes under the water bottle holder and is really unassuming. It is more secure than the reflector, and it kind of just blends into the bike because it’s so boring you just ignore it.
The AirTag holder is bolted under the water bottle holder.
#8 – On My Backpack
AirTag on the outside of my Osprey.
I have an Osprey Backpack I use at work, and plan to use when I get the chance to hike again. I use my keychain case to hook it on the top handle. I know, I know not hidden like the others. Here’s the thing, AirTags have an awesome feature where if something is lost, anyone with a modern smartphone can tap their phone to it, much like they might do for Apple or Google Pay, and then it shows them contact information to try to reunite the bag with its owner. This is actually the original reason I left the AirTag on the outside of my suitcase as well, but I heeded the staff’s warning. In the case of my backpack, I think the risk is enough to keep it visible.
There are some fun cases starting to emerge on Amazon. So if you want to be a little more discreet, you could get a case that isn’t as obvious as to what it contains and just looks like a keychain.
Some Other Ideas I’ve Seen
On Your Wallet
Not a bad idea I have to say. I know that should be the #1 place for my brother. I’ve considered it for myself as well. I’m just concerned it will make it that much more bulky. There are some clever holders for sliding your tag into a card slot like these, or I’ve seen someone at work who just attached one of the classic keychain type to the outside. There are even some wallets popping up with a dedicated slot built into the design like pictured. Definitely, a top priority item you don’t want to lose.
On Your Dog?
One of the most popular cases I’ve seen for AirTags are designed to go on a dogs collar. Personally, I think the ones that are made to have the collar slide through them like this are better than the dangly ones. I’m not so sure about putting one on my dog. I’ve considered it, but it’s not priority on my list.
On Your Child!
Looks like mom & dad’s Apple Watch
I’m not making this up! There are AirTags cases that are designed to help you track your kid. I have to say, this really isn’t a bad idea once you think about it. The best ones, I think, are the ones that look like watch bands and the AirTag slides right in to look like a watch. Better yet, if you buy the AirTag off Apple’s website, you can get free engraving. You could put essential “if found” information such as your phone number or name. If your visiting someplace where kids are likely to go off on their own or wander, this could be a great idea. I can’t help but think of The Children’s Museum when I see these bands. I would definitely strap some kids with these if I were to take them there.
On Your Scooters
Similar to bikes and cars, you may want to tag your scooter or other mobility device. I read an article about how a guy from NYC was able to track down and recover his stolen electric scooter using AirTags. That’s part of why I double tagged my bike. He made sure it was incognito so the thieves couldn’t find the tracking device before he could find the scooter again. There are some cases that are adhesive that could work well in this case. Or another reflector option could be ideal. I’m hesitant on the adhesive styles because of 2 reasons. I don’t know how well they’ll stick, and are they one time use? Knowing I’ll have to change the battery once a year, I want to make sure I don’t have to change out my cases also. Plus, they are more obvious in my opinion.
On Your Remotes
If I would have had this, I wouldn’t have lost my remote for so long.
This one has tempted me. I’ve even looked for a case for my Fire TV remote. I lost it for a long time once, and I wished so bad it had a “find my remote” function. I mean, come on! why isn’t this a built-in thing yet? I digress. Remotes are one of the common uses for the stickable cases I mentioned before. My hesitancy comes from how bulky they are. I haven’t seen a remote solution that isn’t just totally bulky looking and functionally. Maybe if they come up with a design that isn’t so bulky or when the tags get thinner, I’ll add it. If this doesn’t bother you though, it would be a great addition to one of the most misplaced things in your household.
On Your Other Apple Devices
Trick heading! This is not necessary. I’ve been seeing cases and accessories for iPhones and AirPods, but these devices have Find My tracking inheritantly built in. The only exception I’d make is that I have noticed that my AirPods have find my for each earbud when they’re out of the case, but anytime I’ve lost them they were inside the case and they wouldn’t show up on tracking when in the case. While I can see that lending the solution to get an AirTag case for your AirPods, personally I would just prefer Apple to fix that so I can track the case too. I don’t want to have to give up my Capt. Jack Sparrow AirPod case.
As always, there are no rules on the best uses for where and how to use your AirTags. If you have any great ideas not mentioned here, please add them in the comments! These are more like guidelines anyway.
I’ve set off on my first true RV trip. Since it’s January, I wanted to find someplace warmer so I headed to Texas. I’ve never been to the southwest before. I’m currently in Fort Worth so I visited the Fort Worth Zoo. Apparently, it is the #1 zoo in the country.
First of all, who visits a zoo in January, right? I had the same thought, but I hoped it’d still be warm enough to see the animals. Second, the zoo is going through a major renovation. What better time to do that than with so many public places being closed or reduced, but I think they had this in the works already. Unfortunately, this means most of the savannah animals were off display. So sad because that included some of my favorites included tigers, lions, and the elephants. Technically, you could still see the elephants, but not clearly since they were in their smaller enclosures without good sightlines.
When I first arrived, it was nearly half an hour before I saw any animals. I walked around the World of Primates and didn’t see anything. It was cold so it makes sense they weren’t in the outdoor enclosures, but they didn’t seem to be in the indoor enclosures either. It was pretty disappointing because they had some very large and intricate enclosures. I heard some other patrons express their disappointment throughout the day too. Luckily, I circled back at the end of the day before I left, and saw a couple apes, but it didn’t seem like nearly enough for the enclosures available. Plus, they were all in the same small area that seemed to connect to a back room that they all eventually retreated into. Obviously, they need a place to take care of the animals, but keeping them there the whole time seems a bit fruitless. If I had been with my mom, she would have been extremely disappointed because the monkeys and apes are her favorites.
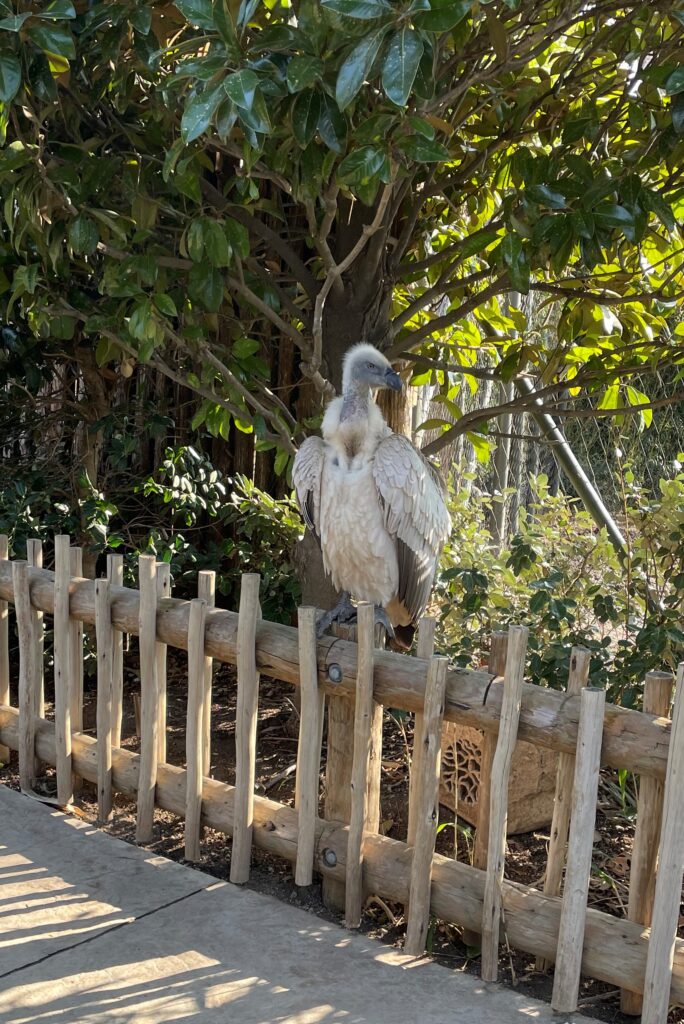
There was a small part of the savannah still open, the giraffe enclosure. I walked around the whole thing, but couldn’t find anything besides birds. Like I said, it was a cold 50 degrees so I can’t say I was too surprised. There was a funny ostrich poppin’ his head around. And then I ran into a large vulture just chillin on one of the walkway fences. He definitely was not supposed to be there. It was kind of funny. Luckily, vultures are carrion birds and don’t attack live prey so we weren’t in danger and walked past without an issue, However, this one guy, I thought he was part of the construction crew but he may have been a visitor, walked up to him and was like talking to him. The bird didn’t like that since he got much closer than anyone else. The vulture did kind of hissed at him and raised his feathers at that, but the guy just wanted to get between the bird and the walkway so the parents with small kids could feel safe passing.
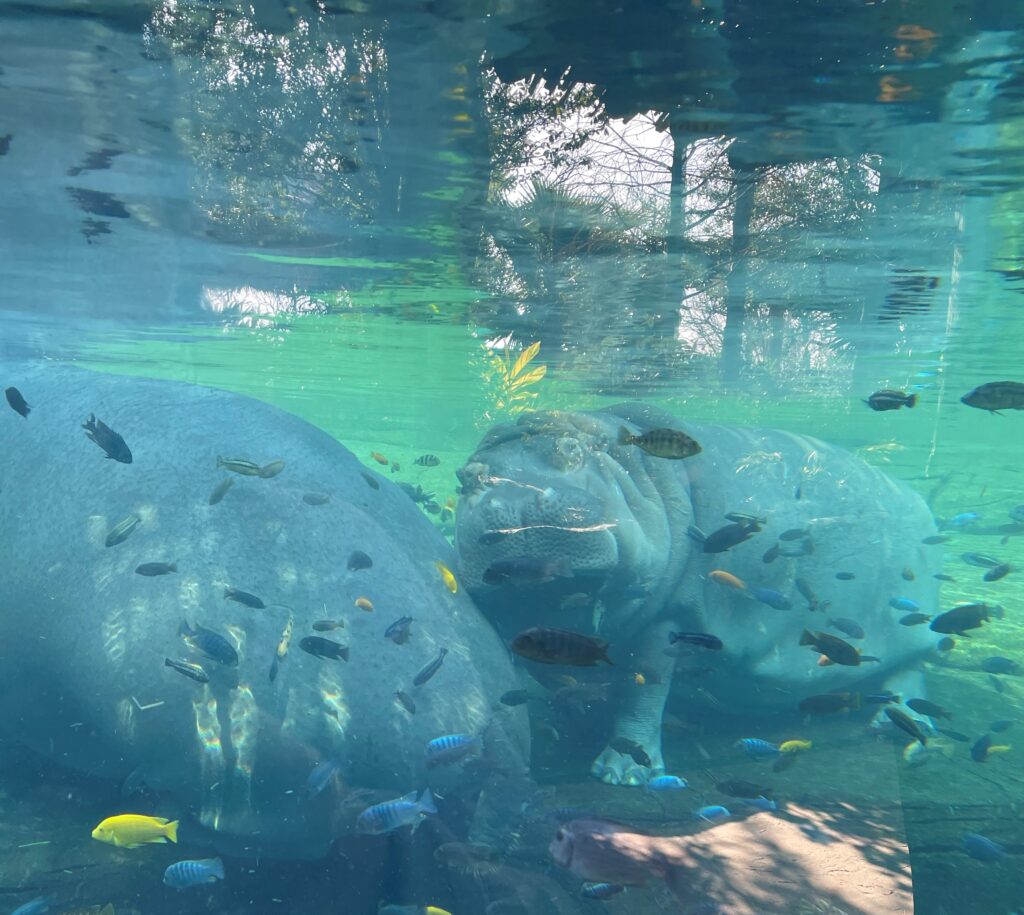
I did get to see the hippos pretty close. They have an aquatic enclosure and spent most of their time pretty close to the glass. In the morning, they were cuddled up sleeping. Hippos normally freak me out a bit since they are one of the most dangerous land animals on the planet, but these were so cute. The one was snuggled up on the other and looked like he was smiling. I saw these guys again later when I circled back, and they were trotting about the bottom of the pool. Definitely, a well set up area since the areas kept the animals wanting to be very visible.
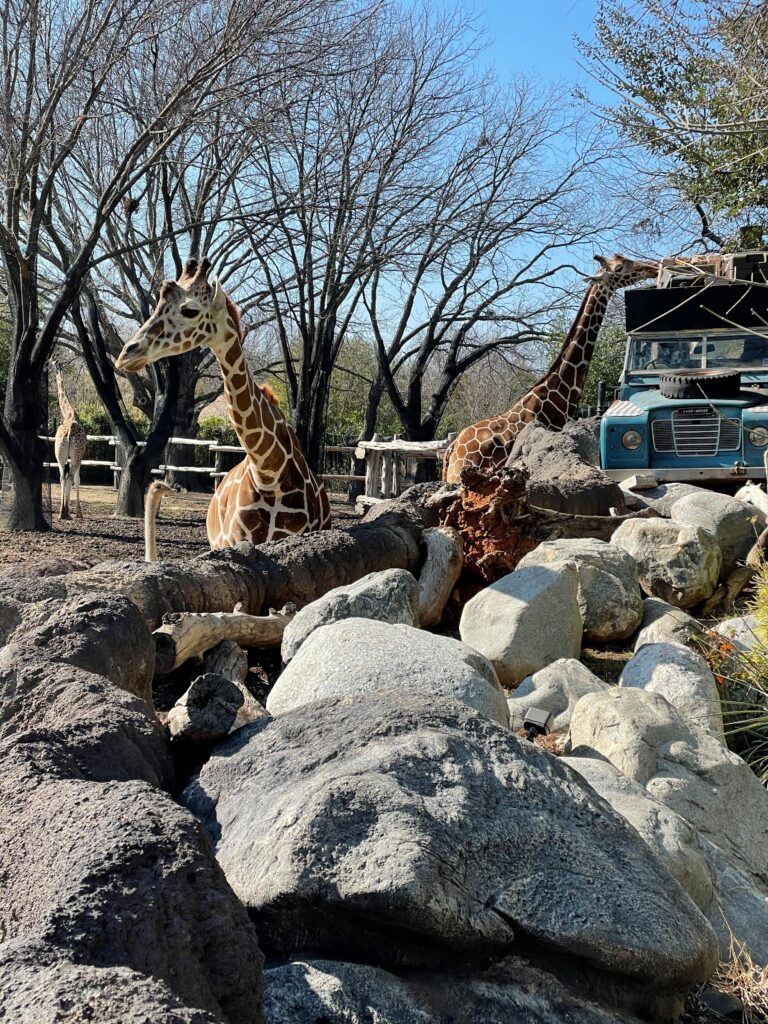
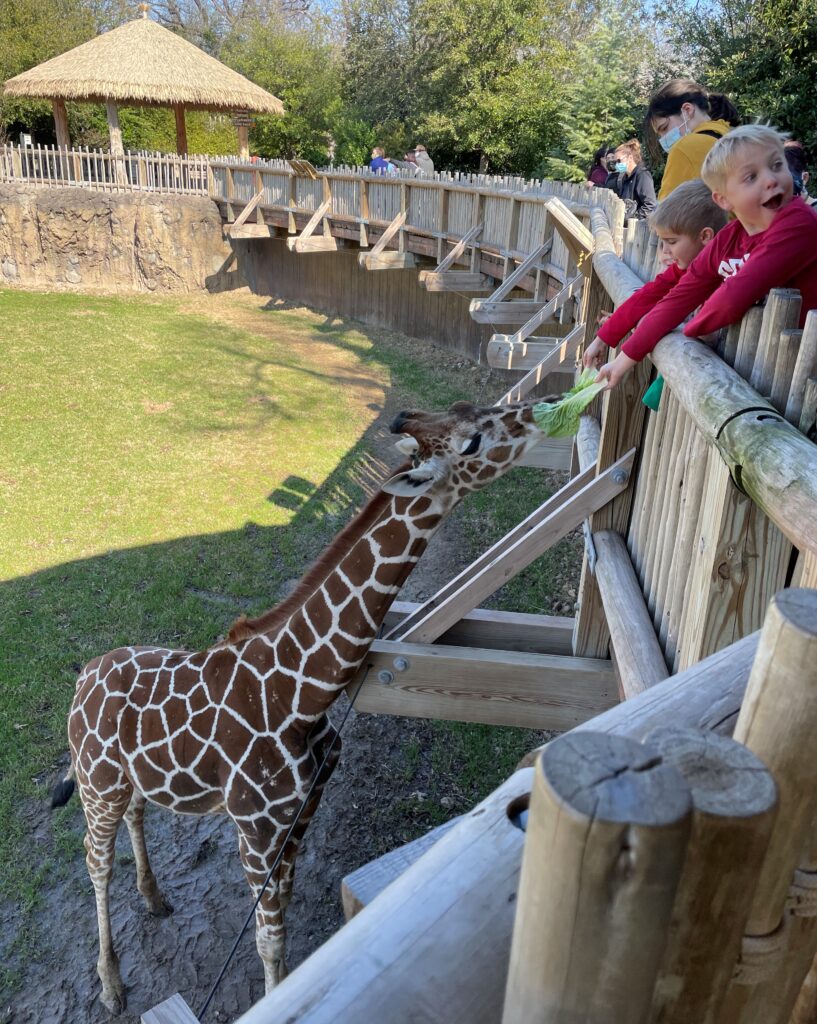
I had to circle back at the end of the day to see the other animals in this area. I saw a black rhino, and he also was fairly close to the pathway. I was also happy to see the giraffes were out when I came back. The tallest ones were on the far end of the enclosure away from the guests, but two of them came right up to the gate even so far as to duck under the wire to keep them back. They had to so people could feed them! I really like how the Fort Worth Zoo does their giraffe feeding. Other zoos I’ve been to have an area where only people who have paid for the feeding experience get to enter. This results in the giraffes only coming close to that area so everyone who didn’t pay doesn’t really get to see them. But not so at the Fort Worth Zoo. People buy the bundles of leaves and then line up wherever they can to feed the giraffes. This resulted in those who didn’t pay (like me) to still get to see the giraffes up close. I was next to several people who fed the giraffes, without taking away from their experience since it wasn’t crowded, and got to see the giraffes with them. I even helped out a mom by taking pictures of her kids while they fed the giraffes. The two smaller giraffes who came up to the fence even came up to me to check me out and see if I had anything for them. I really liked this set up because I’ve never been able to see them so close before. There was a staff member monitoring to yell at people not to touch the giraffes. They really were that close, and it was so difficult to keep myself from petting them. I wanted to so bad, but yeah don’t get any ideas. If you want to feed the giraffes, it is $6 for a bundle. “A bundle” is three leaves. They look like romaine lettuce leaves. $2 per leaf seems like kind of a rip off to me, but if you have your heart set on feeding the giraffes, go at it! I’ll stand by and watch.
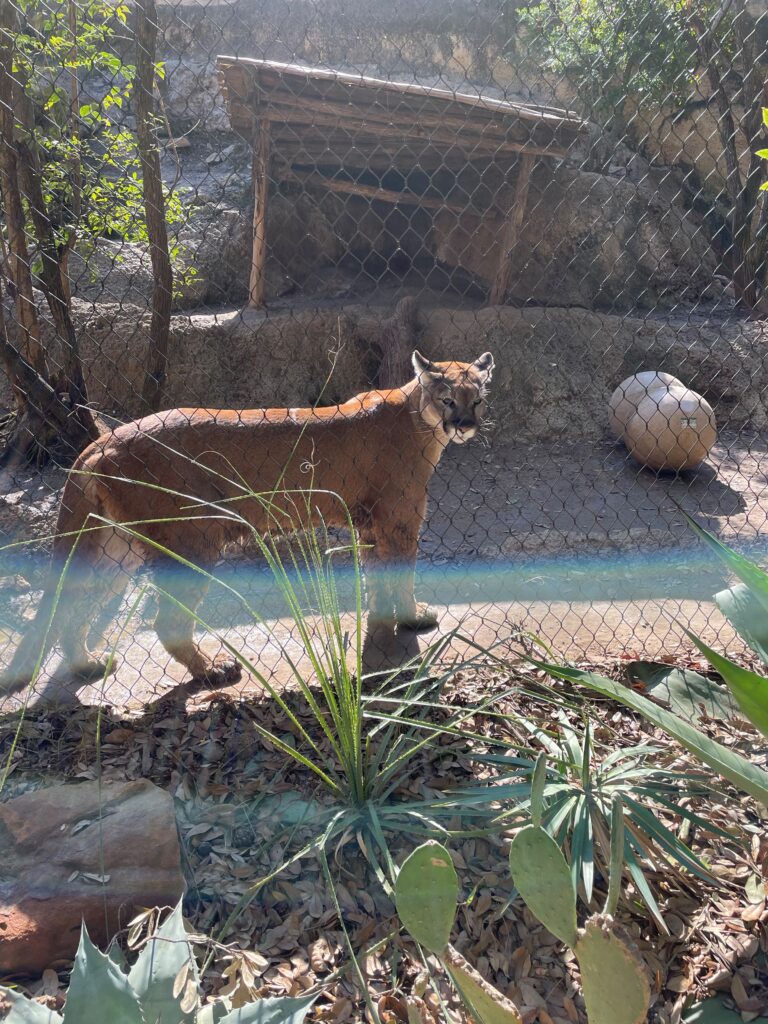
Walking through the rest of the zoo, I found myself constantly feeling like I had missed something or having to backtrack. There are so many little break always that lead to other animals. So pay attention so you don’t miss anything. When I walked into the Texas area, I got all the way through and back to the beginning before realizing I had totally missed the wolves, otters, and crocodiles. I had to go back and do the whole thing again. What happened was there was a fork and I needed to go right to see those animals, some of my favorites, but I went left thinking that right was the main path and I didn’t want to miss anything. Turned out, going right was actually a dead end and where the animals were. I couldn’t see the crocodile anywhere, I’m not sure it was there. I did get to see the cougar and jaguar. They were pretty active and easy to see. If I didn’t get to see the tiger, which I knew was off exhibit when I bought my tickets, then I’m glad I got to see these other large cats.
This zoo has a lot of birds. There was the vulture I mentioned earlier, many different flamingos, parrots, and lots of other birds. The ostrich I mentioned earlier was funny to watch again later when I saw the giraffes. He was messing with them. I literally saw this bird sneak up behind the smallest giraffe and then hiss at him to scare him into running away. I saw no purpose to this except just to mess with the giraffe. It was funny. I also saw an enclosure with hummingbirds and a red tail hawk together. The smallest bird with such a large bird of prey. The hawk actually started tracking me as I walked around the glass, and then it came at me! It didn’t come off its perch and hit the glass, but it lunged and got to the end of the branch coming at me. Glad there was glass in between and he wasn’t just chillin on the side like that vulture.
They also a had a pretty nice looking petting zoo in this area. There’s actually a branch off children’s area that includes the petting zoo. I didn’t go in there, but it looked like a lot of fun for little kids. There’s also a train that goes through the center of the zoo. There’s a station near the World of Primates, and another by the Texas Country area. You can also buy tickets to ride the carousel at the Texas station. The Hall of Wonders and Texas Nature Traders were closed when I visited so I’m not sure what those are all about. I bet they’re worth visiting if they are open when you visit.
They also have a small Australian Outback section with sharks, kangaroos, and penguins. There were no kangaroos out when I went by, and I didn’t see any sharks either. Kangaroos obviously need warm climates, but I don’t think that should have affected the sharks. Honestly, I don’t even remember seeing a place that sharks could have been so I’m not sure what happened or if I missed it. It’s a pretty small section with a simple path so I’m not sure how I could have skipped by the shark enclosure.
Overall, it is a nice zoo. I would very much like to come back in the spring or fall when it’s a little bit warmer, but not super hot. My visit would have been perfect for large cats I think. The new area they are building looks really cool! I’ll have to come back sometime after 2023 when it is finished and all those cool animals go into their new habitats.
A couple small tips from my brief visit. There are several places to get food. Many of them were closed because of covid and reduced admission, but the main ones were open. The Crocodile Café’s prices were slightly better than the prices at The Bluebonnet Café. Plus, at the Crocodile, if you get a good seat you can sit and watch the crocodiles outside the reptile exhibit while you eat. When I was there, they were on land sunning themselves right close up by the windows to the café. I didn’t end up eating at the zoo, but this is where I would have. The Bluebonnet has a western styling, but the setup seemed crowded to me (even though it was completely empty). It just had that feeling that it’d be a bit less relaxed when people are actually there. But it is really convenient to the Texas area of the zoo (it’s right inside the faux main street), plus it has Pizza Hut and Barbecue if that’s what you’re in the mood for. There are also a lot of smaller places and snack stops that weren’t open when I visited, but I bet more will be open in the height of their season.
My other tip would be to download the app. They had a sign at the entrance with a QR code to a map, but I didn’t realize they had an app until halfway through. The map in the app is a little outdated, but they’ll have to update when the expansion is finished. It didn’t seem to have anything incorrect though, just a “coming in 2019” over the petting farm.
They have half-priced Wednesdays. I took advantage of this, and it made the admission very reasonable. If you can go during the weekday, I’d definitely recommend considering this. It wasn’t busy at all while I was there, but I can’t speak for warmer days. I’d expect a lot more moms with young children on a Wednesday than on the weekend.
Finally, currently (Jan. 2021) you MUST make reservations to enter the zoo. They have staggered entry times, and not many people were in the zoo while I was there. It is off season, and the virus is still on the mind so I’m not entirely surprised. I didn’t make my reservations until the night before with no problem. I wouldn’t count on that though, and definitely make sure you have your reservations made before you leave home. You can keep it on your phone and scan at the entrance.
But hey there are no real rules to visiting a zoo, these are more like guidelines. Have fun!
It definitely took me too long to know this is how interior room numbers work. Luckily, I learned before it was helpful. This may be a “duh” moment for some of you, but if you’ve never had this pointed out or thought about it, it may not be. I’ve seen many adults who don’t understand this concept.
The way interior numbers work is actually really simple. This, of course, assumes that you’re not dealing with a crazy layout that ignores the standard protocol. I have worked in an office that took some liberties with these guidelines, and it confused people. Most of the time that isn’t the case though.
Room numbers actually tell you a lot more than how many rooms there are in a building. Actually, they tell you everything except how many rooms there are. For example, if you are in a hotel and your room number is 1503. Does that mean that there are over 1,500 rooms in this building??? Probably not. It actually breaks up in to a sort of code. It actually indicates that there are at least 15 floors to this building.
Continuing this example, the 15 is actually an indicator of which floor you need, and the 03 indicates which room on that floor you need. It’s actually pretty clever and intuitive if you have it pointed out to you. That way, you don’t have to wander around dozens of floors hoping to figure out which floor the room you need is on. That’s what would happen if the numbers were purely linear instead of this code. That’s why you’ll often see that numbers go from 359 to 401 with nothing in between. If you don’t understand the protocol, then you might be left wondering where those other 42 rooms went.
So again, if you’re told you need room 345 then you need to proceed to the 3rd floor, and then to the 45th room (which of course should be labeled 345). Like I said it’s fairly easy and you may have even noticed it yourself, but if no one tells you it’s on purpose then you may not have realized you can count on it. I’m happy to say these are some guidelines you can usually count on.
I’ve been there a many times as a child with my family, as a teenager, and as an adult with my friends. I’ve lost track of the amount of times I’ve visited, and I interned there for a summer. I consider myself an unofficial expert, no big deal.
My recommendation is to let go of some of your parental urge for control. Always keep your kids safe, but most of the exhibits are setup so that there is only 1 entrance and exit. I recommend loosening the reigns a little and let the kids explore of their own volition. Of course, you know your kids best and wait until they are old enough to understand the rules – no one leaves this exhibit alone. You can explore with them or sit at the entrance to keep an eye on them.
Where to start…
I guess, like all things, at the beginning. The museum operates its own, private parking garage right next to the museum. Best part, its totally free!
The best place to park in the parking garage is the 3rd floor on the side closest to the museum. 3000 North Meridian Street, Indianapolis, IN 46208
Seems odd, but there’s a very good reason. The museum has a sky walk from the parking garage to the interior of the museum. You never have to go outside. There is a crosswalk on the street level, but the museum highly discourages – to the point of not allowing – people to use the crosswalk. This is because people drive pretty recklessly in that area, and they frequently run the stop light directly above the crosswalk. Especially if you’re visiting with small children, the skywalk is the safest option to getting to the museum.
The entrance to the skywalk can be found on the 3rd floor of the parking garage.
Beginning Your Visit – Inside the Museum
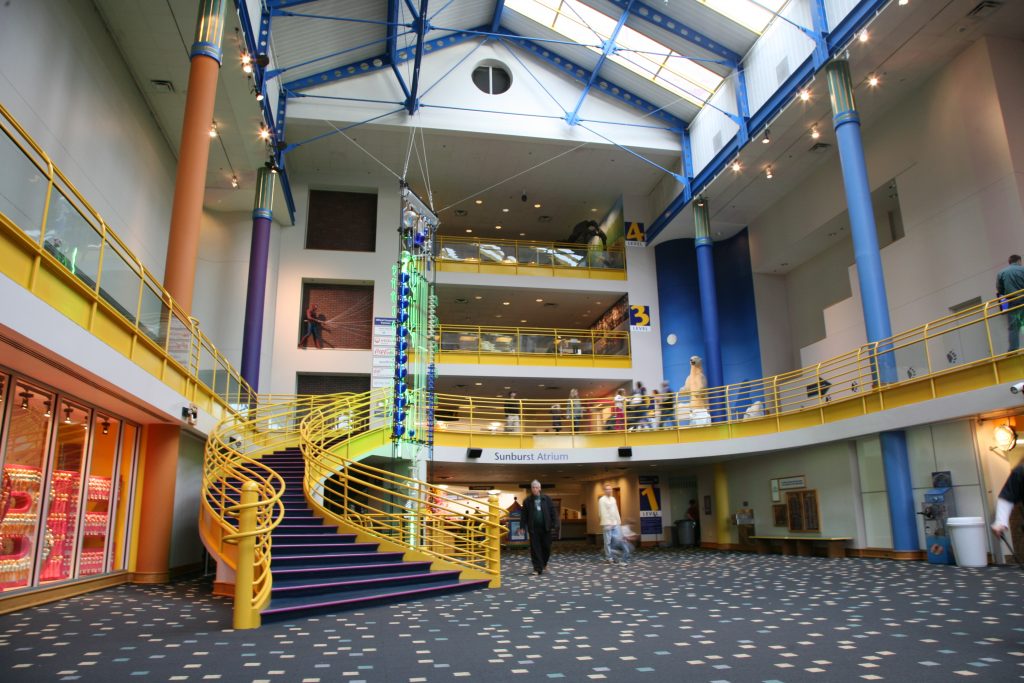
After entering the museum, you’ll be in a large atrium (Floor 1). The entrance to Dinosphere is on the right toward the front and easily accessible. When I visited as a child, this is where we would always start. It is the proper entrance to Dinosphere, but not the only one. The designers at the museum do an amazing job of designing the entrances to each exhibit so that they set the atmosphere and mood. That has caused a duality in my opinion of where to start. Now I would say the best place to start is Treasures of the Earth for a first visit.
Sunburst Atrium has always been the entrance to TCM, even with the modern additions.
Be sure to stop and get a map and list of presentations throughout the day. They have actors performing reenactments, presentations, and fun activities all day. Use this to find any presentations you want to be sure to hit and adjust your schedule to be in the exhibit during the presentations you want to see.
The Structure of the Museum
There are 5 Floors all connected by a winding ramp system. I love this system. It makes it so easy to go from floor to floor without using stairs or elevators. Elevators are still an option. There are 2 sets of elevators: a set on the side closest to the atrium, and a set on the right side (when facing the ramps with your back to the atrium). The ramps are so friendly to an environment with lots of strollers and little feet that wouldn’t enjoy using stairs. Plus, there’s no waiting for elevators.
Ramps seen circling their way up and down the museum with Fireworks of Glass in the center.
We loved running up and down these ramps (as long as there was no one else around us) when we were kids. It was an easy way to let the kids have fun and be free while keeping them still in sight. The ramps have clear platform entrances on each floor, so it’s easy and clear when to stop.
Bathrooms
Most adults don’t need to plan this ahead of time, but if you are going with children it can’t hurt to know ahead of time where the bathrooms are. They aren’t hard to find, if you know where they are, but they’re a little hidden. Expand section to read more.
Lower Level
There are Family Restrooms outside of Dinosphere on the way to All Aboard!.
There are men’s and women’s restrooms next to the Lilly Theater in the main area. These are the closest restrooms to The Lilly Theater, Beyond Spaceship Earth, and Treasures of the Earth.
First Level
As you exit the atrium towards the main museum and information desk, the restrooms are on either side of the entrance; women’s on the left and men’s on the right. These are the closest to The Food Court and The Museum Store.
Second Level
There are family bathrooms outside of Take Me There.
Third Level
There are family restrooms and nursing areas inside PlayEscape.
Fourth Level
Men’s and Women’s are on the right side just on the other side of the elevators opposite from CarouselWishes and Dreams. This is the closest restroom to Carousel and Scienceworks.
There’s no right or wrong way to do the museum. All of the exhibits stand on their own and can be done in any order. This is how I would do it.
National Geographic’s Treasures of the Earth
Location: Lower Level Main Entrance: Level 1 Theme: Archaeology
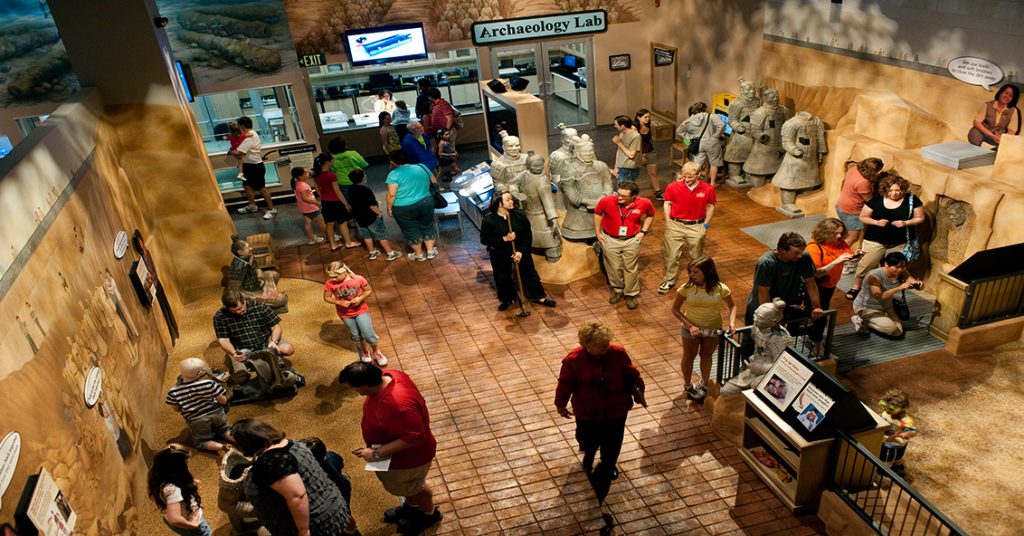
Terra Cotta Warrior section of Treasures of the Earth.
If you go straight into the museum from the atrium and turn right, there is an entrance to Treasures of the Earth. It’s really easy to miss because it’s very small and unassuming. That’s because it’s a ride!
Before getting onto the ride/entrance, be sure to check out the small exhibit just to the right of the entrance. There you can see some information about the exhibit and actual props used in the Indiana Jones movies!
To properly start this exhibit, there is an elevator ride to simulate the experience of being lowered into an Egyptian tomb dig site. There’s a little video presentation talking about what you’re about to see. The ambiance is really fun too.
Upon exiting the ride, you’ll see the entrance to the exhibit. It’s split into 3 parts. From left to right: Seti’s Egyptian Tomb, Captain Kidd’s Shipwreck, and Terra Cotta Warriors – all based on actual archaeological digs.
These are fun, interactive exhibits. There are tunnels to climb in, etchings on the walls to touch, and even some terra cotta warriors to rebuild. The exhibits do a great job of catering to all ages. There’s plenty to do, but there’s also plenty to learn. Through placards and hands-on activities. There is even an active lab with real archaeologists working on active specimens! You can interact and ask them questions or watch presentations.
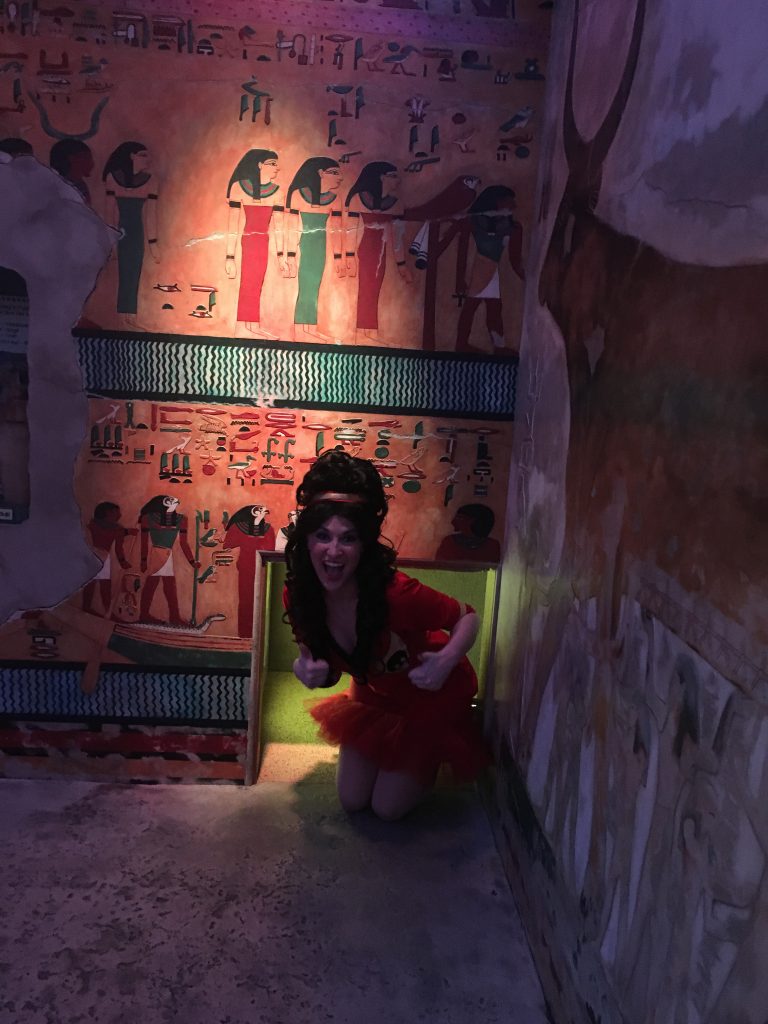
One of the actors from The Lilly Theatre during my internship playing in Treasures of the Earth after hours.
For us this has always been one of the quicker exhibits. Take it at your own pace, and enjoy everything. You never know what cool tidbits you’ll find in a corner somewhere.
For those who visited the museum in the past, this exhibit took the place of What If? (1992-2010).
As you exit and head back to Floor 1, make sure to grab some free tickets to the Lilly Theater show at the ticket booth at the base of the ramp.
The next thing to do would be the other optional first thing to do. If you’re not riding the elevator to Treasures of the Earth, then start at Dinosphere.
The best entrance to Dinosphere, especially if you’ve never been before, is on Floor 1 in the Sunburst Atrium. It may seem silly to go all the way back up to Floor 1 when you’re just going to go back to Lower Level, but the walk to Dinosphere is made to slowly “transport you into another world”. There are flying fossils of pterodactyls and information placards as you descend. Honestly, it just doesn’t feel right entering Dinosphere from any other entrance. It feels like you’re coming in from the back door, because you kind of are. If you don’t want to break your flow, I might suggest waiting on Dinosphere until after lunch. If you go back to the food court or the pack lunch spot, you’ll be back at the the Level 1 entrance and could then use the Level 1 (Main) entrance to Dinosphere.
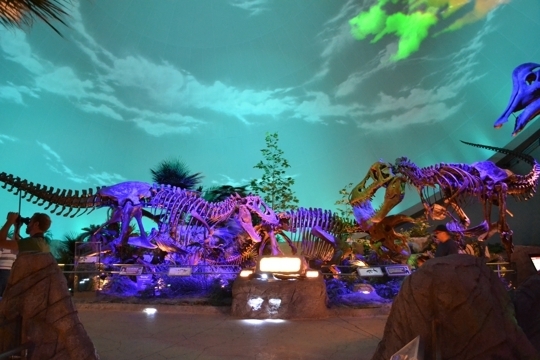
Dinosphere is an amazing exhibit. As you enter you are thrust into the world of the dinosaurs. The dome creates a full affected atmosphere, and it changes constantly. Every half hour there’s a storm. There’s also gorgeous sunsets, and day scenes. You can feel the atmosphere shift during all of these.
There are several fossils on display. Unlike most other museums, they display the actual fossils in the exhibit and not only replicas. There’s actually a placard that shows which of the bones are fossils and which are replicas. Some are replicas simply for the sake of completing the structure because those pieces weren’t recovered.
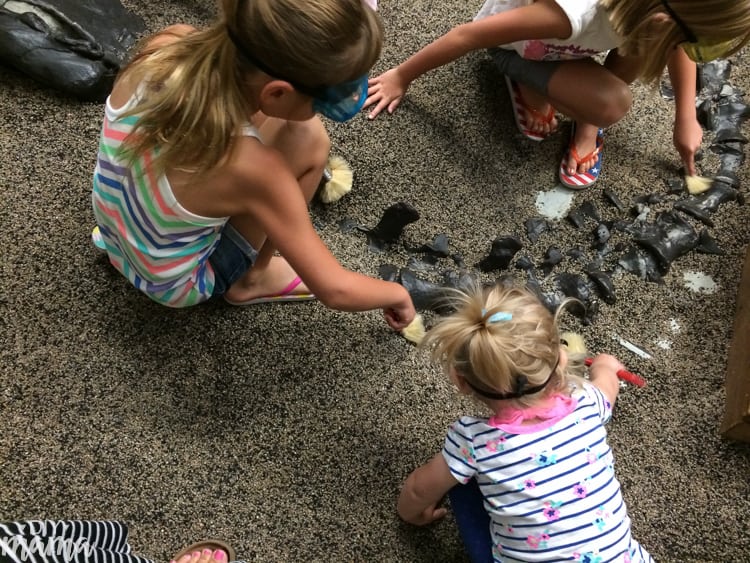
There are lots of fun activities alongside the educational ones. Dinosphere hosts fun, short tunnels to crawl into and become part of the exhibit. There’s also a costume section where you can pretend to be a dinosaur building it’s nest and taking care of eggs. One of the highlights is the excavation site. Kids can don some safety goggles and become an archaeologist themselves as they try to uncover fossils.
Dinosphere also features an active paleo lab with some real paleontologists who you can talk to and ask questions. You can even get the change to touch a real fossil they’re currently working on.
A frequently overlooked part of Dinosphere is that it actually spans 3 floors. The main floor is on LL, but it expands upwards. It even has it’s own private elevator and staircase that stays within Dinosphere. On the second floor of Dinosphere, there is an overlook. It’s actually almost hidden when you’re on the main level, but it’s a cool way to see the exhibit from above.
One more level up and there’s an entire exhibit about paleo-art. Did you know there were artists that specialize in adding life to the fossils that are discovered? This exhibit is on the older side, as in, little kids might not be super interested. Since I was pre-adolescent when Dinosphere was installed, my friend and I would go up there by ourselves and play with the clay modeling and tracing stations. It also has a second, higher overlook, but the second floor is better in my opinion.
You can spend a lot of time in Dinosphere. It is always one of our longest. Keep that in mind, and make sure you leave enough time to not feel rushed. Another reason we frequently do it first.
The natural exit to Dinosphere leads directly into All Aboard! one of the oldest exhibits at the museum. It has been a part of the collection since 1968. This exhibit features a real life locomotive, the Reuben Wells, from around 1868. The current building was built around the train in 1976. The train runs a light and sounds show every 15 min.
You can go inside the car behind the engine, and sit in it. There’s video presentations you can watch, and the windows have videos that make it seem as if you are riding.
There’s a section where you can dress up, and pretend to be a ticket master handing out tickets. There are usually toy trains to play with in this section as well.
You can also see models of trains in their hay-day and even crawl through to a peek-out inside the train display. Make sure to look up as there is a train running around up above.
The exit to All Aboard! brings you back to the main section of the Lower Lever outside of Treasures of the Earth.
You may have noticed the 43 foot tower of colorful spirals the ramps surround. Fireworks of Glass was installed in 2006, and is the work of renown artist Dale Chihuly. It’s a gorgeous centerpiece to enjoy all day.
On the lower level, there’s an exhibit dedicated to this art piece. It’s a great chance to slow down and enjoy the art, and learn about glass blowing. There’s a fun video game where kids can “design and blow” their own piece of glass. It’s actually a really fun way to learn about all the steps to glass blowing.
This is a really relaxing exhibit and totally engaging even though there’s so little to it. The black circular bench in the center of the exhibit actually slowly turns. This lets you lean back and really take in the base of the glass ceiling. The ceiling is see-through so you can take in the whole base of the piece. It makes a gorgeous ceiling to the exhibit, and there’s so much that you can sit and look for a lot longer than you would think. There’s even a hidden object game you can play, looking for specific pieces in the ceiling.
We frequently hold off on this exhibit until later. Toward the end of the day, there’s usually less people there. You do not want to bother with this exhibit if there’s a crowd. Plus, it gives us a chance to get off our feet and relax for a little while after being on them all day.
Outside this exhibit, you can find the ticket booth to the Lilly Theater. They run 2 shows daily except Mondays. The tickets are free, but you need to pick them up before hand to get a seat.
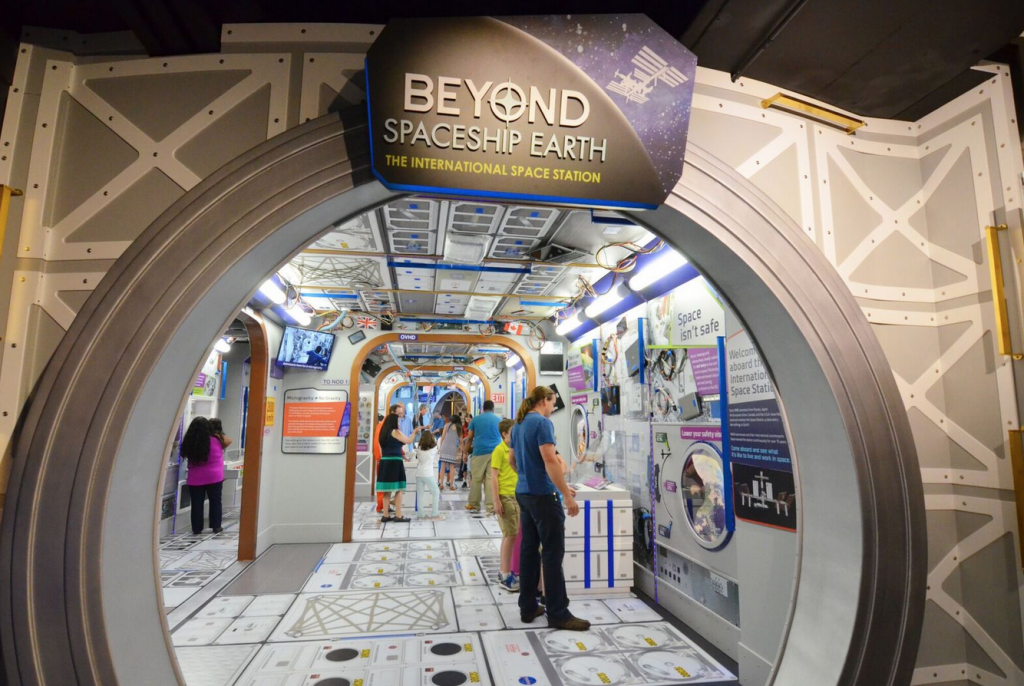
Beyond Spaceship Earth & ISS
Location: Lower Level Entrance: Lower Level Theme: Space
Beyond Spaceship Earth simulates what it’s like to be in the International Space Station
This exhibit opened while I was interning in 2016. I was so pumped about this exhibit, and it did not let me down. I adore Beyond Spaceship Earth.
The exhibit is a replica of the interior of the International Space Station (ISS). It lets you explore what it’s like to live and work in space. There are games that focus on themes about space travel, along with information to learn more about living in space.
At the entrance near The Lilly Theater, you can put on some space packs with various countries flags. You can wear the proper gear as you pretend to run space walk missions and explore.
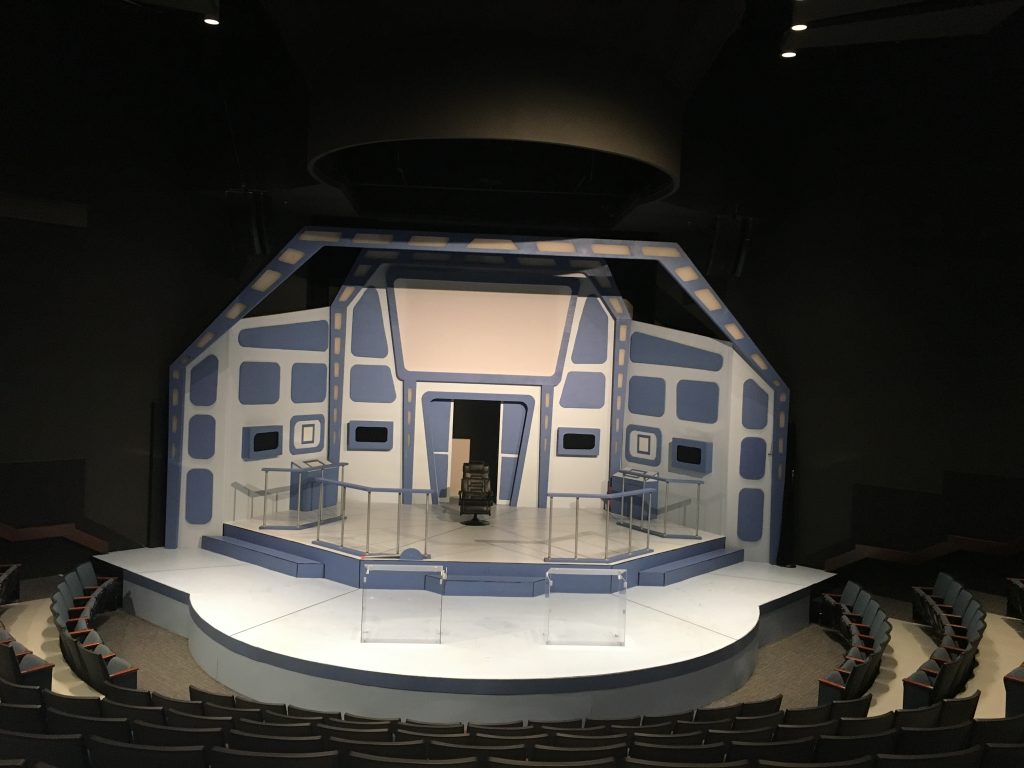
At the end of the ISS, you can continue into a planetarium dome that now houses the actual Liberty Bell 7, the 2nd U.S. capsule ever flown in space! It tells the story of Gus Grissom’s flight into space and return. Outside the theater you can find props and memorabilia related to space and various space related shows, such as Star Trek. Even if you don’t sit for a show, look for an opportunity to visit the exhibits inside the planetarium between shows.
The Lilly Theater
Location: Lower Level Entrance: Lower Level Theme: Live Theatre
One of the hidden gems of The Children’s Museum is The Lilly Theater. This frequently overlooked exhibit can be loads of fun, and a great opportunity to get off your feet for a bit.
They run 45 min. shows that are geared for children, but fun for adults too. The show I worked on in 2016 cracked me up – and I saw it twice a day for a whole summer! Their shows change regularly. There’s usually a Christmas show, a spring show, and a summer show. So you can see a different production every time you visit.
The theater is very child friendly, I mean that makes sense, they will let you in and out if you need to handle an upset child. Most theaters you can’t enter and exit, but please! the actors and staff would greatly appreciate it if you excuse yourself with a crying baby and return when all is well again. You can even choose not return to if necessary. It is not a babysitting service though, so don’t plan on leaving your kids or napping for 45 min.
If your kids adore the show, they can even get the opportunity to meet them after the second show. The actors frequently do a meet and greet after their last show. They are such fun people.
The theater requires tickets, but luckily they are free! You can obtain them in the morning ahead of time at the booth outside Fireworks of Glass, at the bottom of the ramp.
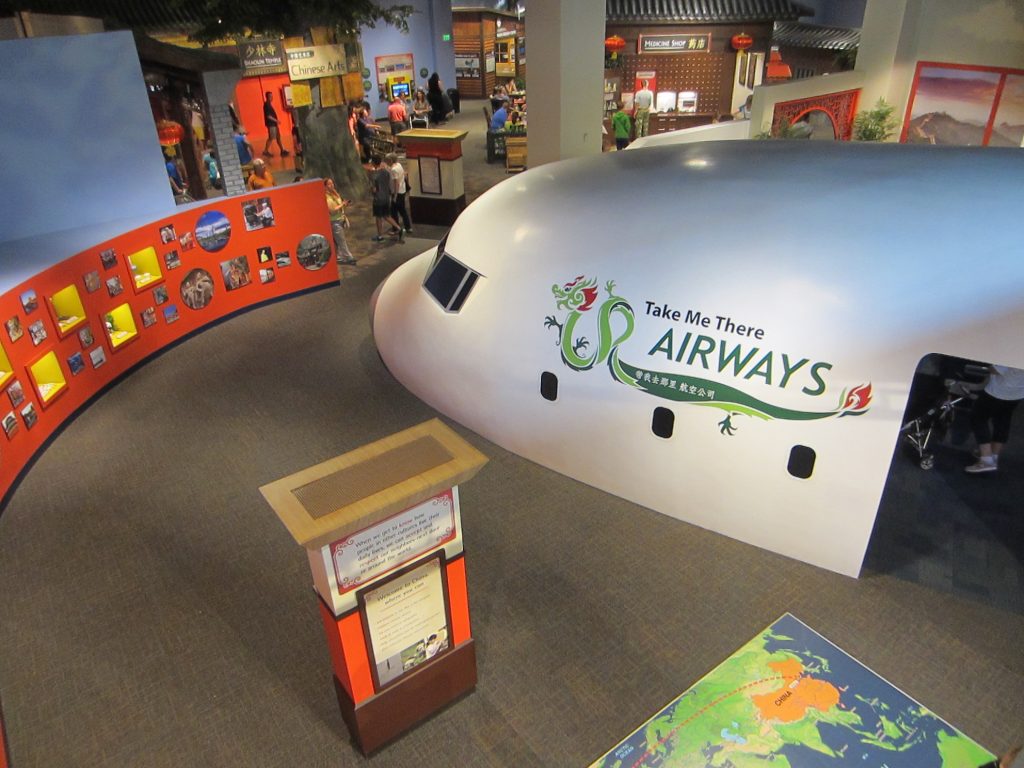
Take Me There
Location: Level 2 Entrance: Level 2 Theme: Cultural
This is another exhibit I adore. I remember the first time I visited and I was blown away with how well done and engaging it was.
Take Me There is a permanent exhibit with a rotating theme. Every 4 years or so they change which country the exhibit features. The first time I visited it was Take Me There Egypt, then it rotated to Take Me There China. Currently, it is Take Me There Greece. One of the reasons my siblings and I went back as adults was to see the updated country.
This exhibit begins by you entering a plane. There’s plane seats and a short video to pretend that you’ve flown to another country. You exit in Greece!
You can then explore apartments designed from two different families living in that country to give an idea of how people live all around the world. You can visit stores and markets modeled just like the ones you can find in those countries.
All along the way there are hands on activities to experience things unique to that culture. For example when it was China, you could write with a brush and copy Chinese script. There were crafts you could make and take home as well.
They frequently have live performances and gallery interpreters throughout this section. Check the information sheet you grabbed at the information booth for exact times and descriptions.
This is a must see exhibit and is friendly for all ages.
If you visited in the past, this replaced Passport to the World (1986 – 2008)
Rotating exhibits at the museum are always changing. These are a great way to always keep TCM fresh, and they’re so fun.
There are 3 galleries that house temporary exhibits. They are all on Level 2. There’s one on either side of the Sunburst Atrium, and another just inside the museum on the right (above Treasures of the Earth.)
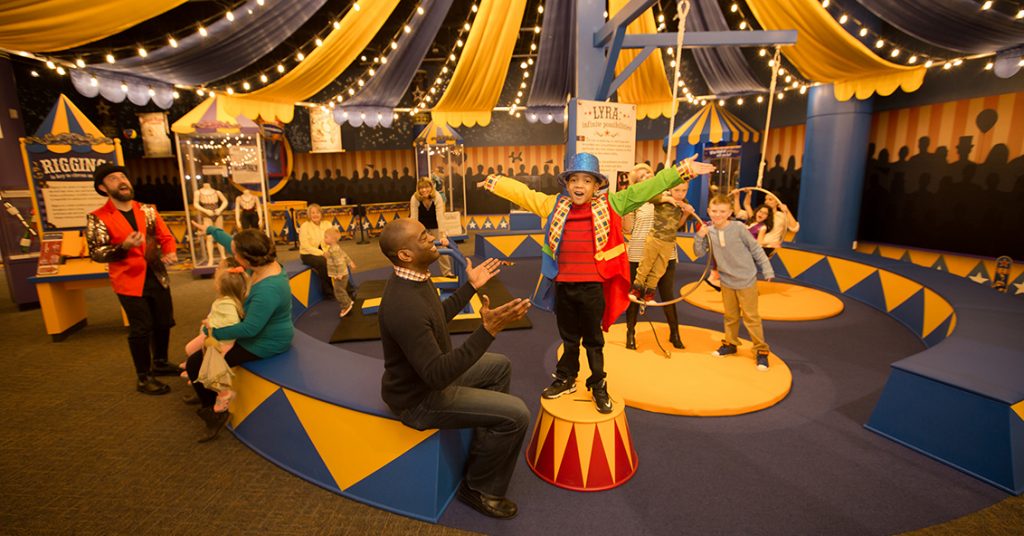
Some of my favourite exhibits have come through these galleries. I remember a circus exhibit when I was younger, and appears to have had a reappearance recently. I also remember a Spies exhibit. That exhibit was epic! We visited so many times while that was set up (thank goodness for a membership). It was all about espionage, codes, the art of disguise, and spy gear. It was awesome, and so hands on. I think you can tell I still miss that exhibit.
Usually one of the rotating exhibits will be tuned toward younger children while another may be older. While I was interning, we opened a Doc McStuffins exhibit in coordination with Disney Junior. While at other times, there has been a Titanic and King Tut exhibit. I remember in the Titanic exhibit you were given a name at the beginning of the exhibit, and then at the end you looked up your name to see if you survived or not. Fun idea, but a little morbid. I remember the exhibit was more like a typical museum with less fun hands on things than most of the others. Recently, we returned to check out the Minecraft exhibit. There were little kids and adults having fun seeing and interacting all their favourite elements from Minecraft.
There are a couple reoccurring rotating exhibits such as Jolly Days and the haunted house. I’ve never been to the haunted house because I think it costs extra, or it did. Jolly Days is fun though.
Jolly Days
Jolly Days is part of the Christmas theming the museum does. It’s set up as Santa’s village with “ice skating”, “snowball fights”, and “ice-fishing”. You can also visit Santa and Mrs. Clause and get a picture with him. It’s a busy exhibit, but still quite fun.
The yule slide is a blast for all ages
Be sure to check out the rotating exhibits while you’re there, it may be your only chance to see them!
Playscape
Location: Level 3 Entrance: Level 3 Theme: Young Child Enrichment
Playscape looks so fun. I wish I was 5!
Speaking of exhibits catered to young children, Playscape is a no-big-kids-allowed gallery. Only children 5 and under are allowed in this gallery.
When I was young, one of my favourite exhibits was Playscape. Of course, I was able to enjoy it longer than most since I could accompany all of my younger siblings into the exhibit when they were the right age. I was so sad when we all finally aged out.
The exhibit is completely different than when I was a kid, but it is still so cool. I haven’t been able to explore it since I’m not 5 yo, but I was given a tour once. It’s so cool. Those 5 year olds are lucky ducks.
There’s a whole crawl and climbing space that looks like leaves stacked, and a gentle stream for the kids to play in. They also do music enrichment sessions led by a gallery interpreter that gives little kids their first experience with instruments.
This gallery also features nursing rooms, and quiet rooms to give moms and kids some needed space.
Seriously, try to catch a peak if you can, but you won’t be allowed inside. There’s an actual guard at the door who will stop you if you’re not 5.
The Power of Children: Making a Difference
Location: Level 3 Entrance: Level 3 Theme: Children who changed the world despite bias of their time
This is a powerful exhibit.
In a complete 180 on Floor 3, opposite of Playscape you find The Power of Children.
This exhibit can be mature for some kids, but the museum does a great job of allowing the adult to decide what their kid is and isn’t ready to learn.
The exhibit follows the lives of 4 children who faced discrimination and stood up against bias. Like Treasures of the Earth, there are 4 different places you can start. Each section has a road, modeled to look like the road each child would have walked in their life, that leads to a building dedicated to each of the children.
The children highlighted in the gallery are Anne Frank, Ruby Bridges, and Ryan White, and Malala Yousafzai. They discuss how these children stood up against racial discrimination, and bias against disease.
As the parent, you can decide how much you tell your kids about the exhibit and the details of what it discusses. This is an extremely powerful exhibit, and I’ve seen many young kids having a good time in it without knowing what’s written around them. The museum does give suggestions on how to approach these difficult topics with children, and encourages adults to have appropriate conversations with them to help them understand.
Each of the 4 buildings has a presentation that runs on a set time loop. There is an announcement before one starts so you can be sure to enjoy it. They also bring in actors who do performances as the people from these real life stories. Actors do interpretations as Anne Frank, her father, Ryan’s friend, and Ruby’s teacher. Fun fact: Ruby Bridges won’t allow any interpretations of herself while she is still alive.
Elton John performed at Clowes Hall in Indianapolis benefiting The Children’s Museum in 2010 to mark the 25th anniversary of his friend, Ryan White, passing. Ryan’s room at the exhibit perfectly replicates his room in Muncie, IN.
Ryan’s mom moved to FL, but she still visits the exhibit once a month to continue to raise awareness just like Ryan did during his life. If you visit and see a woman passing out bracelets at a table in Ryan’s section, talk to her. She’s probably his mom.
If you visited in the past, this exhibit replaced Mysteries in History (1985 – 2006).
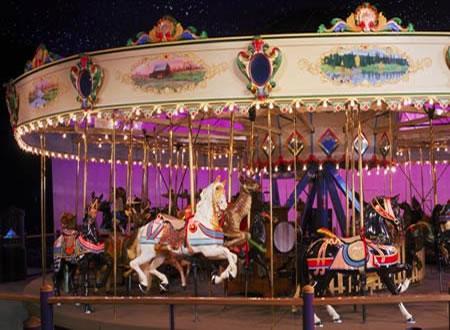
Carousel Wishes & Dreams
Location: Level 4 Entrance: Level 4 Theme: Whimsy
This is another exhibit that can be a long visit. One of the classic exhibits which features a restored 1917 Carousel which used to be in Broad Ripple Village on the bank of the White River. The carousel costs $1 per ride, but is included with a membership. The carousel has 3 different kinds of seats. There are sleighs with bench seats – great for those with small kids and babies who need to hold them during the ride. There are stationary animals – these have all 4 feet on the ground and do not “jump” during the ride. There are also several “jumping” horses – these move up and down during the ride. If I remember correctly, children 9 years and younger are not allowed to ride the jumping animals. Museum staff should direct you.
There are also playhouses hosted in the exhibit, including one that used to belong to Eli Lilly’s daughter.
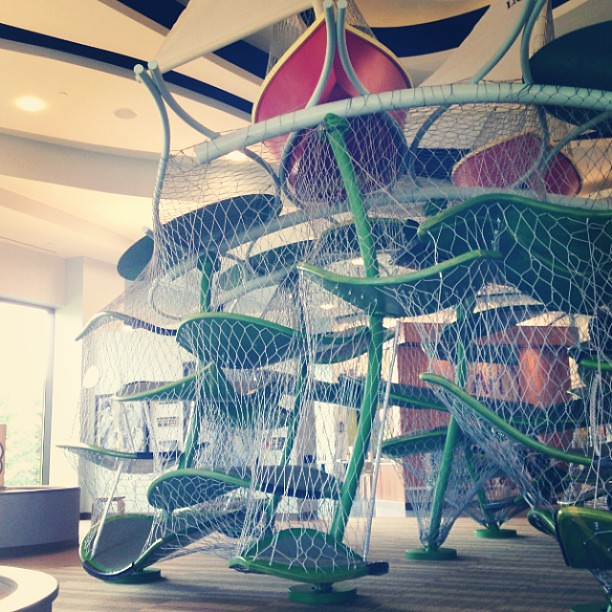
At the entrance you’ll find the entrance to a maze filled crawl spaces, toys from decades past, and whimsical things to see and do. Even a small room with mirrors on every side. This is a really fun exhibit with lots of tunnels and elements to explore.
ScienceWorks
Location: Level 4 Entrance: Level 4 Theme: STEM
Science works has always been a favourite exhibit. This exhibit has always been a high-activity, hands on exhibit filled with tons of fun. When I visited after the reopening, I was a little disappointed to see some of the more active elements had been removed during the exhibit revamp , but I’m happy to see that some of those elements are still there now. Looks like a revisit is definitely due for me! This exhibit features sections with lessons on environmental sciences like weather and farming. There are also exhibits about cave systems, and chemistry behind water systems. They have always done a great job of making all of these topics extremely interesting and fun. They also tend to focus locally so everyone is learning about the plants, animals, and water systems that affect their community and how science works to make them work for all of us.
If you visited in the past, this exhibit will looked markedly different despite maintaining its name. The mining activities and crane have been replaced, the boat building and the underground tunnels have been removed.
Other Things to Look for
While there are so many cool exhibits in the museum, be sure not to miss any of the mini exhibits spread out through the halls. You can find lots of fun exhibits like a woolly mammoth, Indy car you can get inside, and a collection of doll houses. These don’t take up much time, but are really fun to discover as you make your way around the levels. You can find the exhibit “Stories from Our Community” along the halls, and they’ve even featured items from a Star Wars collection throughout the halls in the past.
Outside the Museum
Just outside the Sunburst Atrium, is a small garden with miniature replicas of famous structures. Its a commonly overlooked area so it’s usually not crowded at all. It’s a nice area to get away and just have a calm walk. Keep a lookout for a chestnut tree. The museum has a sapling from the actual tree that was outside of Anne Frank’s window that she wrote about in her diary. TCM is the first place in America to be given a sapling from that tree.
Ok full disclosure, I know I called myself a pro and I’ve always considered myself one given my extensive experience with the museum, but they went and installed an awesome new outdoor section that I haven’t been able to visit yet. This area was announced and under construction while I was interning at the museum and to my chagrin I have not been able to visit yet. It’s definitely on my list to do and I will update after I do. For now, here’s a great peak at what this area has to offer.
I finally got to go back and check this out. It’s pretty cool and could definitely take up a good chunk of the day. We climbed to the top of the tree and got a good look. It really is a cool facility. It could be one of the coolest playgrounds your family hits this summer, but its all sports. My only concern would be playing here to your hearts content and running out of time in the museum!
This area features elements from sports and activities to encourage kids to get outside and be active! It’s also a great place to learn and improve some sports skills in a safe place with coaches who know the game. Sports Legends Experience is included with the price of admission to the museum. All outdoor areas are weather dependent. Always check the forecast and the museums website for closures. It is also seasonal. Trust me, you don’t want to go out there during those Midwest winters anyway. There is an indoor portion of the exhibit that features hockey and basketball that is open year round.
AVENUE OF CHAMPIONS
Indiana is home to many sports legends throughout history. The “Avenue of Champions” features 16 statues and histories of people with ties to Indy. It’s a fun way to see prominent members of the sports community and perhaps inspire a budding young athlete. We learned about some athletes and sports teams we had never even heard of before.
BASEBALL
Learn about one of America’s oldest games, hang out in a dugout like the big leagues, practice your homerun, and perfect your curve ball with a pitching tudor. You can also learn about the Indianapolis Clowns baseball team, and pretend your batting in an Indianapolis Indians game with the photo-op section! These guys looked like they were having a blast with a mini-game going.
BASKETBALL
In the land of Hoosiers, basketball is a must! Play as a member of the Pacers or Fever and learn some fundamental moves to take yourself up to the big leagues. Perfect your shots, passes, and beat the clock – or outpace your family members – at the shot clock. There were several hoops in all different heights so anyone can play at their level.
FITNESS PATH & TRACK
This features a 2/5 mile track with stations to work out some various muscles. Learn about runner Wilma Rudoph. You can go through the 5 stations of the section starting with a warm up, and wrapping it up with a cool down. Plus, learn exercise tips from representatives from Riley Children’s Health to help you get the most from your exercises. My sister and I had fun messing around on their outdoor fitness equipment, and getting a better look at the mini-golf course.
FOOTBALL
Pulling inspiration from the Indianapolis Colts experience first hand what it’s like to defend your end zone by learning how to grip a football properly and avoid opponents. Learn about local legend Reggie Wayne, and try out your chops as a kicker with either of the 2 goal posts. As always, they have a size for the little kickers and the big so everyone can try. Finally, pass the ball to family members as they dodge around cutouts of opponents. There was even a station where you could pass the ball to a family member and try to dive over a wall of defenders. I saw a dad and his kids try it, and it looked like so much fun.
GOLF
Featuring a 9-hole course with difficulties for beginners to pros. Learn about Pete and Alice Dye while perfecting your putting skills. There are even 2 holes designed by Pete & Alice with replicas of some of those most notable designs from all over the world. This area has scheduled programming you can participate in. Don’t worry if you or your loved ones are new to golf. There is an introductory course to bring you up to speed so you can get the most out of all the skills you’ll learn. There’s even a toddler course for the budding golf pro! They were putting with tennis balls when we visited. I imagine that’s for the best as the course is close to many of the others. I do wish we would have had enough time to check this out because the course was really pretty.
HOCKEY
Play on the street rink and shoot or guard during some street ball. You can learn how to pass and shoot properly with your family. Perhaps this will even inspire some new games for your backyard.
RACING
Indy is of course the home to some major races. Experience your own Indy 500 with the pedal cars at the racing section. There’s a pagoda to learn the history of the famous local race, and a safety video so everyone has a great time with no injuries. After you win your race, you can get a photo in the Winner’s Circle. These seems to be the most weather dependent, and all parts of it weren’t being run when we visited at the end of the day. I would definitely check the daily schedule if you have your heart set on this one.
SOCCER
Take the offensive or defensive position during some shooting practice. There are large and small goals to practice different fundamentals of shooting a soccer goal, and work on your dribbling and passing skills as you go down the field.
TENNIS
Following the guidelines for USTA’s 10 and under tennis, kids can get their first introduction to the racket game. You can pass the balls back and forth, stretch your forehands and backhand hits, and learn about Barbara Wynne and her passion to teach tennis.
TREE OF SPORTS
This 25 foot climbing tree lets you climb in and out of the sports featured in the exhibit, explore with talk-tubes, slide down the slide, and get a bird’s eye view of the “Sports Legends Experience”. This looks like a blast to explore, and I’m sure it’ll be one of the highlights of the trip. See if you can spot the broom branch and find out what it means by exploring inside the tree.
The tree does have a lift for accessibility options. Be sure to ask a staff member for more information.
The Children’s Museum of Indianapolis has always been one of my favourite places to visit in the city. Don’t worry about rushing to get to everything. There’s always something new to discover every time you visit. Have fun, relax, take it at your own pace. You can follow my suggested order or jump around however you like. Either way, I do recommend grabbing a list of daily live events and performances from the info booth at the start of the day. It is easy to miss these and they really do add a lot to the experience. Whatever you decide to do, let loose and have fun. Remember, these are more like guidelines anyway.
The summer after I graduated from college and waiting for job applications to bear some fruit, I decided to drive to Florida and do some auditions at Disney World. My great-aunt and uncle were so generous to let me stay with them for a month so I wouldn’t have to pay for lodging, and at short notice at that. I was and am so grateful for their generosity. On the way there, however, I may have driven myself right into a crazy situation.
From where I lived in the Midwest, Orlando is about a 16 hr. drive with good traffic. Of course, that doesn’t factor in rest stops, food, and running out of gas. Yup, that’s right. I was that girl. So a little background. At the time I was driving my 2003 Mercury Mountaineer. While I loved that car, he was a bit unreliable in the gas tank department aka I didn’t really trust my gas gauge, and therefore I didn’t keep a good eye on it. Instead I had a decent idea of my typical mileage on a single tank and when I’d get close to that I’d compare with the gauge to get an idea of where I was. When I drove my dad’s car before I bought mine, it would tell you how many miles you had left on a tank which got me in the habit of running the tank as low as possible to get maximum output from each fillup.
So combine that with being on the road for 14+ hours, and the monotony of highway driving, and we set the scene. It’s about 9ish pm and I’m on the phone (handsfree) with my cousin talking to keep myself awake and focused. I’m in no-wheres-vill Georgia a little from the border of FL. Suddenly, I look down at my gauge and see the needle on E, it may have even been a little below.
“Oh NO! I need gas. I NEED GAS NOW!”
Luckily the highway at that moment was fairly free of other cars so I could change across to the right-most lane as fast as possible.
My cousin, of course, starts asking me the details of what’s happening. There’s 2 gas stations at the next exit whose sign I pass at that moment so it’s about 1 mile away.
She says to me, “Has your gas light come on?”
“No! There was no warning!”
“So you should have enough in the tank to take you that far if the light hasn’t come on yet.”
“Ok right, that makes sense. It’s a mile away so hopefully I can make it.”
Then the light comes on, and the engine shuts off. Thanks for nothing, buddy.
I coast as far as I can, which isn’t as far as I’d like, and the car stops moving.
I’m now about .7 mile from the exit, my car is down, I’m alone, it is getting dark, and there is nothing around me except swampland and highway. So my only option is to walk to the gas station, buy a gas can, and carry it back.
My cousin who is still on the phone tells me that she doesn’t want me to walk alone, and I’m like what other choice do I have??? She suggests calling the police on the non-emergency line and seeing if an officer could follow me to make sure nothing happens. We know they won’t drive me or get the gas for me.
I call them and describe where I am, the dispatcher says it’s actually highway patrol’s area and transfers me. I then talk to a grumpy officer who clearly doesn’t want to help me. He says that he’ll see if he has anyone to send my way, but I should check with my insurance, credit cards, etc. to see if I have any roadside assistance. I already did check all these, but now I have to bite the bullet and call my parents to make sure we don’t have anything, and tell them what happened. As I suspected, nothing I had had any reasonable roadside assistance that could help me at the moment. It’s been a long time so I call the non-emergency back, and get transferred again. When I ask the officer if he was still coming, he says no I was never sending anyone. No one is available.
By this time about an hour has passed. The evening light has turned to darkness, and the empty highway has become backed up to a crawl because of a crash just ahead of where I am, and another just behind. I have no choice, but to walk. So an hour wasted and I’m no closer to getting back on the road, and my aunt and uncle are expecting me, it’s already late, and I have at least 2 more hours to go. Plus, I’ve had to go to the bathroom since the car stopped. Great!
I grab this awesome bright flashlight I had with me, my leatherman (everyone should have a pocket knife), my wallet, and my passport (I had this with me incase I succeeded in getting a job). I wanted to have valuable and essential items on my person in case someone breaks into my stranded car. Now I did not turn the flashlight on to walk the shoulder of the road. It was a clear night, and the lights from the traffice was adequate. Mostly, I didn’t want to draw more attention to myself being a single, young, stranded, girl. I took it mostly incase someone did mess with me, then I could flip it on and blind them. Luckily none of these things happened.
I can’t remember if it was on the way there or on the way back, I think on the way there, I called my parents to calm them that I was ok, and as another little insurance against foul play. So about 3,700 ft. later and I get to the off ramp.
As I make my down the ramp, a fire engine is pulling off the same ramp beside me and passes me. When I get to the street I see the closest gas station, which looks super run down and sketchy, is closed. Almost everything on the exit (which is hardly anything) is dark and closed. Definitely not an ideal place to get stuck. So now my brain starts flooding, do gas stations close? what happens if the other one is closed too! I’m going to be stuck here.
Luckily I see the BP is open. Now I think this is a good thing because I usually think of BP’s adjacent stores to be nicer of the gas station options. Not this one. It’s the sketchiest and smallest BP I’ve ever seen. As I walk up, there’s a whole bunch of bikers. Like the classic leather vest – long white beard – kinda scary looking – bikers. This does little to comfort me. I walk into the store and see the bathroom is behind the counter in the middle of the store. It looks awful and there’s a rope tied across it blocking the entrance with a paper that says “CLOSED”. Remember, I’ve really needed a restroom going on 2 hrs.
I wait for the cashier to finish helping the biker, and before he can even fully turn away, she looks at me and goes, “No.”
Of course, this threw me off and confused me. So I say, “What?”
“You looked like you were going to ask for the bathroom. The answer is no.”
“Well, I do need it, but clearly it’s closed. Actually, I need to know if you have gas cans.”
“No. We fill them (obviously, I think, you’re a gas station.), but we don’t sell them.”
I hadn’t considered a gas station wouldn’t sell gas cans!
That seems so basic, gas station = where you buy gas cans.
Like I said before there is NOTHING around so there’s no where else I can go get a can. I don’t know what to do. I just walk back outside. Outside, I see the fire truck that passed me earlier at one of the stations. Firefighters, you’re supposed to be able to trust firefighters and ask them for help, right? Right? I mean, as a woman, you’re not inclined to open yourself up to any strange man, but of all the men I’m supposed to be able to trust a firefighter to be good and help me. I decide I don’t have a choice, well it’s the best option of the choices.
I walk up to one of the firefighters. He’s a young guy, probably around my age, and I explain my situation. I ask him if he has a gas can I could borrow. I’ll be coming right back to this gas station to fill my car’s tank, so I’ll be able to return it. He tells me that the only thing they have is gas cans filled with mixed fuel, which will do nothing except blow out my engine. That won’t help me. Then he suggests buying a 2 liter, emptying it, and filling it with gas to take to my car. Now, I’m no mechanic, but I know enough for there to be an iching at the back of brain that that’s a bad idea. 1. Because if any of the leftover pop gets into my engine, it could also ruin it. and 2. I’m like 95% positive you can only carry gas in containers made for that purpose. Now I can’t speak to the details of either of these concerns so I can’t do much in terms of negating besides hesitation, and brainstorming other options. Eventually, his partner comes up and asks what’s going on. We explain, and firefighter #1 explains his idea, and #2 confirms both of my worries. The gas would melt through the 2 liter before I get to my car, and anything left over that mixes with the gas into my engine would be very bad.
There is a decent flow of people coming into the gas station so we keep asking them if they have a gas can I could borrow. No one carries one.
Finally, the firefighter says, “You probably won’t like this option, but there’s a bunch of truckers next door, and at least one of them should have a can you could borrow.”
“That sounds perfect! Why wouldn’t I like that idea?”
“Well, it’s a gentleman’s club. I thought you might not feel comfortable going over there.”
“Oh, well, it doesn’t seem I have a choice.” At that moment another car pulls up so I check one last time to see if he has a can I could borrow, with no luck. So again I come to do I trust this firefighter. So far he seems nice and helpful, and him versus a club full of truckers, I’m thinking I’m supposed to trust firefighters. So I ask him if he’ll go with me, and he agrees.
So we walk over to the club. I go inside the front door which leads to a enclosed booth with a big, heavy, wooden door to the right. Basically, so you can’t see anything without paying. I talk to the clerk behind the counter, who is really nice, and ask him if he can check and see if anyone has a can I could borrow, I’ll bring it right back.
Finally! I catch a break. Their cook had a gas can in his car, and it’s already mostly full. Thank goodness, I can finally start moving forward again. As the firefighter and I are walking back to the gas station, he gets a call on the radio that there’s a crash at such and such mile marker. I’m pretty sure that’s the mile marker my car is at! NO! Please don’t let that be my car. I can recover from empty gas tank, but if someone has hit my car going at highway speeds, I’m sunk. I’ll be stuck in the middle of no where with nothing to do and no where to go. I try to tell the firefighter and ask if I could maybe get a ride, but he holds a hand up so he can hear the radio again.
Then he turns to me and tells me to get in. I do with the full gas can. They then say that it was the same accident they had been called to before arriving at the gas station so the call was cancelled. Since they weren’t going onto the highway, they couldn’t take me to my car. They dropped me off at the exit I came down before, which was only a couple feet away, but nice thought at least. I’m very thankful for their assistance, especially firefighter #1.
Now I have to make the trek back to my car. The crazy traffic has died down at least so it’s just me and the night. Only thing I really have to worry about is a stray alligator lol. Luckily no trouble on the way back. I get to the car, which is fine, and I open my tank to fill it with gas. This particular gas can seemed to have a crack where the spout neck connects to the screw-cap. So as I begin to try to pour the gas into my tank, it’s spilling out of that crack all over my arms, the side of the car, and the ground. Moving it around I get the chugging sound so I’m pretty sure, for the moment, it was at least getting some gas into the tank. That eventually stops so I stop trying thinking that I’ll just try to get there on what I’ve managed to get into the tank, and hopefully that will get me to the gas station. If not, I’ll just try again. As I’m putting the can in my trunk, red and blue lights pull up.
At this point, I’m completely exasperated and the officer comes out to ask if I was the break down who called for help earlier. I didn’t think he was coming, and honestly he barely even made it in time to find me at all. Due to my exhaustion, I start rambling. I don’t remember everything I said, but it ended with “this gas can is broken, and the gas got everywhere – on the ground, my arms oh and it’s starting to burn – but I’m not sure that I got enough in the tank to make it there so will you follow me to the gas station to make sure I make it there?”
He agrees and then puts both his hands out, looks me directly in the eye – very serious now-, and says, “Do you need rescue?”
“What?”
“Do you need rescue? For the gas, do you need rescue?”
“Oh no. I have baby wipes in the car I should be fine. I just need you to follow me.”
So I finally get to the same gas station with the cop in tow, and fill my tank. I should have refilled the gas can before returning it, but my brain was flustered and otherwise occupied with the cop waiting on me. I still feel bad I didn’t think to do that. When I’m all filled up, I explain where I got the gas can from, and that a fireman accompanied me the first time. I ask him if he would go over with me to return it. He says yes, I’ll follow you. That confused me until I realized I had a functioning car again. Lol.
I drive over, and he follows me. I arrive just intime to see the cook getting ready to leave so I can return his can and thank him in person. The cop drove away basically right after I parked so a lot of good he did.
Now I’m stuck with a delemma. If you remember, I still.haven’t.used.the.restroom! I could get back on the highway, and find an exit with a restroom, but that’s going to take all the more time. My aunt and uncle are still waiting for me 2 hours away and it’s about 11 pm now. On the other hand, I could see if this club will let me use their restroom so I can save time.
I walk inside to thank the clerk for his help, and I ask him if I could use the restroom. He agrees, then he realizes he has to check my ID to let me past the big, heavy, wooden door. My ID is in the car so I promise I’m 22, but that’s not good enough. I then realize I still have my passport on me so I get that out. I definitely threw him for a loop with that because he had clearly never had anyone use that form of ID because he didn’t know where to look. With that settled, he let me in, and pointed me towards the restroom.
This is where I find out/confirm myself that strip clubs in real life are a lot different than you see in movies. I make my way through and I see restrooms. The sign for the men’s restroom pointed down a long all and indicated there were showers there too. Yuck.
The women’s restroom was flush with the wall, no hallway. I open the door and right infront of me is a wall and to my left is an opening with a bunch of lockers. Suddenly, I think I’m now where I should be so I check the sign again, and confirm it says Women’s Restroom.
I go inside to discover that they use this small restroom as a changing room for the girls as well. Makes sense since they probably don’t have many women as patrons. There are 2 girls inside. One is changing into sweats to go home, and the other must have been on break because she’s just hanging out in her work clothes, or lack thereof.
I say excuse me and I just need to use the restroom. They’re like come on in honey it’s yours to use. The 2 toilets were through another doorway separate from the mirror and sink where they were changing. To my discomfort, I discover the toilet stalls had their doors removed! I ask if I should close the door, and again they tell me it’s my bathroom do whatever I want. I, of course, say that it’s their bathroom and I’ll close it, but obviously it’s theirs so if they need to come in…. I chose the stall farthest away from the door so no one would have any need to pass me if they did come in. Good thing too because not 2 seconds later one of them apologizes and tells me she needs to use the restroom as well.
Finally, my needs are taken care of and I can get back on the road. As I wash my hands, the girls kind of questioned me about what I was doing, and I told them how I was heading towards Orlando and my car broke down, and this was the only place I could find help and a bathroom. They were really nice girls.
I arrived at my great aunt and uncles house after 1 am with a crazy story now. I bought a gas can before I drove home. Actually, I think this story is the biggest reason I went kind of overboard with what I keep in my car as I detail in this post. Better safe than sorry, right? Check your gas levels regularly on a long road trip, more like a rule rather than a guideline in this case.